Introduction
Two years ago, in 2018, I was introduced to Docker by a colleague of mine who was a brilliant programmer. Thus, I started my Docker journey on my own by reading tutorials online. I was developing a WordPress website for a clinical data collection software that I wrote and it was easy to launch the three containers (MySQL, WordPress and nginx) in a single docker-compose.yml to see the website come to live. However, for some reasons, I wanted to host a second website on the same VPS and I was trying to make jwilder/nginx-proxy work as reverse proxy. There were many days of trial and error but as I couldn’t understand the full logic of a reverse proxy hence, I failed to deploy the nginx proxy. Recently, I had the chance to revisit jwilder/nginx-proxy again for this new WordPress website and through a couple of failed attempts, I learnt what are the causes and effects which I am going to share in this tutorial. And of course, I will guide and share a working nginx-proxy built with Docker Compose as well!
Prerequisites
- Docker Engine installed
- Brief knowledge of Docker Compose
- nginx-proxy/nginx-proxy @GitHub
- nginx-proxy/docker-letsencrypt-nginx-proxy-companion @GitHub
- WordPress, MySQL and phpMyAdmin container images @Docker Hub
Step 1 – Start jwilder/nginx-proxy with Docker Compose
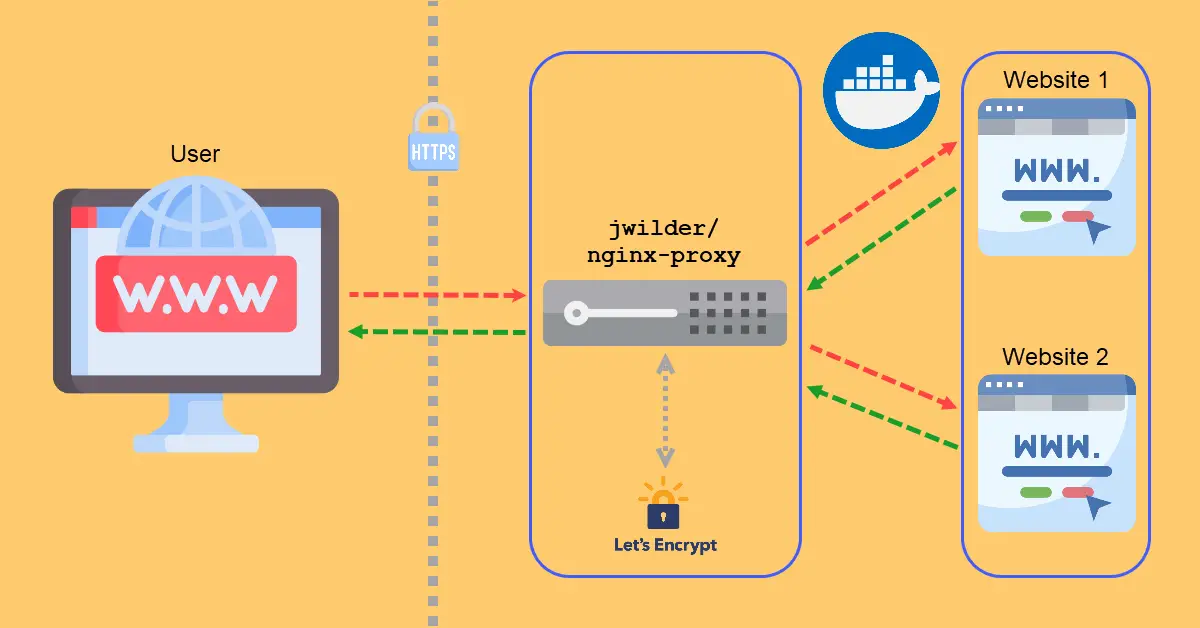
jwilder/nginx-proxy at GitHub is popular because when deployed correctly, it is easy to serve multiple websites (e.g. WordPress) via port 80 or 443 on a single server. Without a reverse proxy, Docker will complain that it could not bind to port 80 when, for example, a second WordPress container is being deployed. Following the usage guide on how to deploy nginx-proxy with Docker Compose, you can do away with the whoami: container which is for testing purposes. The networks: section is required because the rest of our application containers will tap on this external nginx-proxy network.
version: "2"
services:
  nginx-proxy:
    image: jwilder/nginx-proxy
    container_name: nginx-proxy
    restart: always
    ports:
      - "80:80"
    volumes:
      - /var/run/docker.sock:/tmp/docker.sock:ro
networks:
  default:
    external:
      name: nginx-proxy
Step 2 – Add letsencrypt-nginx-proxy-companion for Creation and Renewal of Let’s Encrypt Certificates Automatically
letsencrypt-nginx-proxy-companion is a lightweight companion container for the nginx-proxy. It allows the creation/renewal of Let’s Encrypt certificates automatically. These days, it seems to me that all websites no matter big or small, have payment gateway or not, should run on https:// which ensures a encrypted communication between a website and a web browser. Furthermore, Let’s Encrypt is free and works well with CloudFlare Free plan.
We will add ports: 443 and three new volumes: (certs, vhost.d, html) to nginx-proxy container. Next, we will add the letsencrypt-nginx-proxy-companion container (nginx-letsencrypt) and mount all the volumes from (volumes_from:) nginx-proxy container. DEFAULT_EMAIL is optional but recommended to provide for Let’s Encrypt to inform you about expiring certificates.
version: "2"
services:
nginx-proxy:
image: jwilder/nginx-proxy
container_name: nginx-proxy
restart: always
ports:
- "80:80"
- "443:443"
volumes:
- ./nginx-data/certs:/etc/nginx/certs
- ./nginx-data/vhost.d:/etc/nginx/vhost.d
- ./nginx-data/html:/usr/share/nginx/html
- /var/run/docker.sock:/tmp/docker.sock:ro
nginx-letsencrypt:
image: jrcs/letsencrypt-nginx-proxy-companion
container_name: nginx-letsencrypt
restart: always
volumes_from:
- nginx-proxy
volumes:
- /var/run/docker.sock:/var/run/docker.sock:ro
environment:
- DEFAULT_EMAIL=email@example.com
networks:
default:
external:
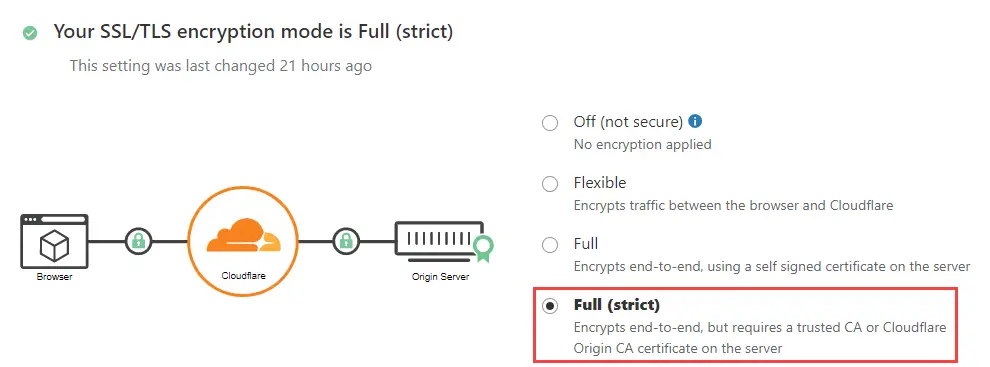
name: nginx-proxyIn my case, I was using CloudFlare DNS and I changed the SSL/TLS to Full (strict). One common error we might see on browser is Error 526 Invalid SSL certificate. This happens when we try to visit our website immediately after spinning up all the containers. Wait up till 5 minutes, the error should go away if all the docker-compose.yml are coded correctly.
Step 3 – WordPress, MySQL and PHPMyAdmin with Docker Compose
In another project directory, create a new YAML file to configure for these three services – WordPress, MySQL and phpMyAdmin.
We can create a .env file below to store our secret password and add to .gitignore so that Git will not track it.
MYSQL_ROOT_PASSWORD=rootsecret
MYSQL_USER=sqluser
MYSQL_PASSWORD=secretdb: We can choose between MySQL or MariaDB from Docker Hub but we will deploy MySQL for this tutorial. According to this MySQL vs MariaDB benchmark here, MariaDB outperforms MySQL by 379 requests per sec to 295. While MariaDB would have been my first choice but I was following a tutorial that was using MySQL instead when I attempted to build WordPress with Docker Compose. The volumes: ‘logs’ and ‘mysql-conf’ are optional but useful for troubleshooting and tweaking MySQL for performance.
phpmyadmin: This is an optional service and is only required when we want to access the database directly to do some SQL operations. For example, we will need to update a few tables when we migrate WordPress to another domain name. Next. we go to our DNS management to create a A record (subdomain) for phpMyAdmin access. As a precaution and good practice, I always setup HTTP authentication (Step 5) as additional security layer to log in phpMyAdmin. Always use depends_on or networks over links because according to Docker docs, the –link flag is a legacy feature of Docker and it may eventually be removed.
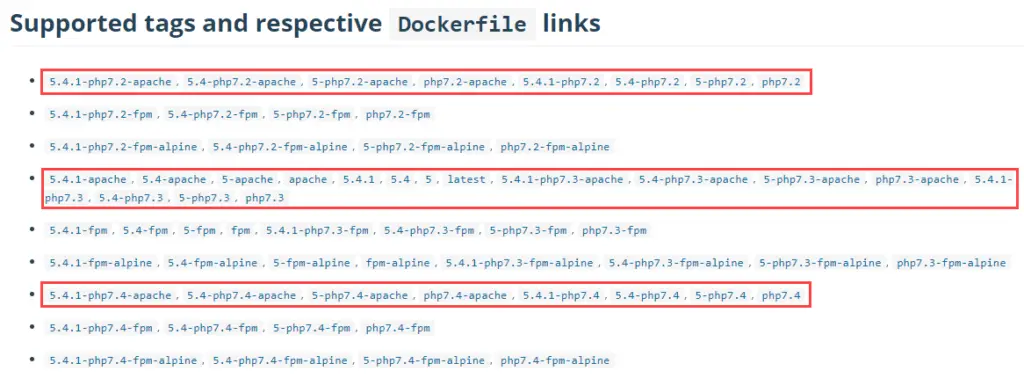
wordpress: The image: is tricky and I will explain why! Previously, I was running services nginx, MySQL and WordPress in a single YAML file. My image was ‘5.4.1-php7.4-fpm-alpine‘ because I favor php-fpm and alpine is known for its small size. However, I got Error 502 Bad gateway on my browser after I converted to nginx-proxy and removed nginx container. It took me half a day to figure out that the selected WordPress image is the problem. The reason is when we use nginx-proxy, we don’t spin up a NginX or Apache web server container anymore hence all the images below will fail except those with ‘-apache‘ in the name.
I have not figured out how to make nginx-proxy work with php-fpm (FastCGI) on port 9000. This line – WORDPRESS_DB_HOST=db:3306 is required to replace the soon deprecated links: By right, networks: should be used to replace links: but I tried many methods and none worked. The error when spinning up the containers was “MySQL Connection Error: (2002) php_network_getaddresses: getaddrinfo failed: Name or service not known“. – VIRTUAL_PORT is not required when we use expose: according to nginx-proxy instructions at GitHub.
version: '3.7'
services:
  db:
    image: mysql:8.0.19
    container_name: db
    restart: always
    env_file: .env
    environment:
      - MYSQL_ROOT_PASSWORD=${MYSQL_ROOT_PASSWORD}
    volumes:
      - dbdata:/var/lib/mysql
      - ./logs/mysql:/var/log/mysql
      - ./mysql-conf:/etc/mysql/conf.d
    command: --default-authentication-plugin=mysql_native_password

  phpmyadmin:
    depends_on:
      - db
    #links:
      #- db:mysql
    image: phpmyadmin/phpmyadmin
    container_name: phpmyadmin
    restart: always
    expose:
      - "8002"
    env_file: .env
    environment:
      - MYSQL_ROOT_PASSWORD=${MYSQL_ROOT_PASSWORD}
      - VIRTUAL_HOST=phpmyadmin.example.com
      #- VIRTUAL_PORT=8002
      - LETSENCRYPT_HOST=phpmyadmin.example.com
      - LETSENCRYPT_EMAIL=email@example.com

  wordpress:
    image: wordpress:5.4.1-php7.4-apache
    container_name: wordpress
    depends_on:
      - db
    #links: # required but legacy feature and links have been replaced by networks
      #- db:mysql
    restart: always
    expose:
      - "8004"
    env_file: .env
    environment:
      - WORDPRESS_DB_HOST=db:3306
      - WORDPRESS_DB_USER=$MYSQL_USER
      - WORDPRESS_DB_PASSWORD=${MYSQL_PASSWORD}
      - WORDPRESS_DB_NAME=wordpress
      - VIRTUAL_HOST=example.com
      #- VIRTUAL_PORT=8004
      - LETSENCRYPT_HOST=example.com
      - LETSENCRYPT_EMAIL=email@example.com
    volumes:
      - ./wordpress:/var/www/html

volumes:
  dbdata:
  mysql-conf:
  wordpress:
  logs:

networks:
  default:
    external:
      name: nginx-proxy
Step 4 – Spinning up nginx-proxy and WordPress Containers
Go to nginx-proxy directory and execute docker-compose up -d. However, I would recommend docker-compose up first to check for startup errors before going into -d detached mode where containers run in the background.
$ cd nginx-proxy/
$ docker-compose up -d
$ cd ..
$ cd wordpress-docker
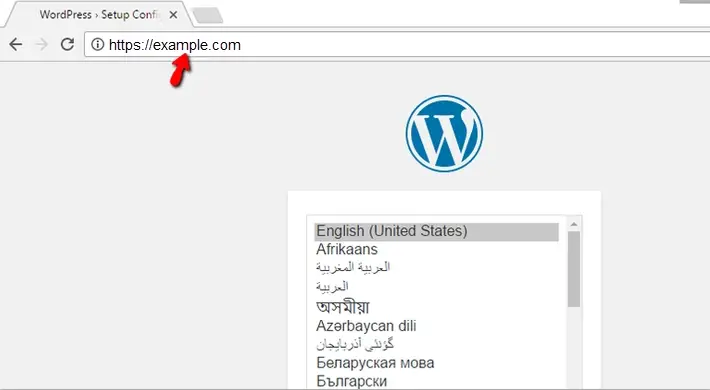
$ docker-compose up -dNext, we repeat the same for wordpress-docker directory. Open your browser and you should be able to see WordPress installation on example.com and access phpMyAdmin via phpmyadmin.example.com. Remember that your SQL server login credentials is in .env file.
Step 5 – (optional) Add HTTP authentication for Security and Block Search Engines
A website under development is not ready for public access hence we should block search engines from indexing it. Within WordPress admin, there is an option to discourage search engines from indexing and you can add robots.txt to disallow them as well. However, not all search engines especially the lesser-known ones will abide by the rules and adding HTTP authentication is an excellent method to block access to both search engines and public access. All we need is to add volumes: – ./(path):/etc/nginx/htpasswd as mentioned under Basic Authentication Support for nginx-proxy at GitHub.
nginx-proxy:
    image: jwilder/nginx-proxy
    container_name: nginx-proxy
    restart: always
    ports:
      - "80:80"
      - "443:443"
    volumes:
      - ./nginx-data/certs:/etc/nginx/certs
      - ./nginx-data/vhost.d:/etc/nginx/vhost.d
      - ./nginx-data/html:/usr/share/nginx/html
      - ./nginx-data/htpasswd:/etc/nginx/htpasswd
      - /var/run/docker.sock:/tmp/docker.sock:ro
We can use apache2-utils to generate the htpasswd files and store them in the designated directory listed in volumes:
$ sudo apt-get install -y apache2-utils
$ sudo htpasswd -c ~/nginx-proxy/nginx-data/htpasswd/example.com httpuser1
$ sudo htpasswd -c ~/nginx-proxy/nginx-data/htpasswd/phpmyadmin.example.com httpuser2

$ ls -l nginx-proxy/nginx-data/htpasswd/
total 8
-rw-r--r-- 1 root root 48 May  7 10:23 example.com
-rw-r--r-- 1 root root 48 May  7 11:03 phpmyadmin.example.com
Step 6 – (optional) How to Host Multiple Websites
We will be able to launch many more application containers with the use of nginx-proxy. All we need is a new YAML file for every new application with these settings expose: (unused port) and VIRTUAL_HOST=(domain or subdomain). Add LETSENCRYPT_HOST=(domain or subdomain) and LETSENCRYPT_EMAIL=(email address) if the new application is on https:// and last but not least, duplicate the necessary networks: at the end of the YAML file.
version: '3.7'
services:
  hello-world:
    image: hello-world
    container_name: hello-world
    restart: always
    expose:
      - "8006"
    env_file: .env
    environment:
      - VIRTUAL_HOST=helloworld.example.com
      - LETSENCRYPT_HOST=helloworld.example.com
      - LETSENCRYPT_EMAIL=email@example.com
    volumes:
      - ./hello-world:/var/www/html

volumes:
  hello-world:

networks:
  default:
    external:
      name: nginx-proxy
Conclusion
Traefik is another open-source HTTP reverse proxy and load balancer that can work with Docker. Although I have not used it before, I saw some YAML file using it (sample below) and it looks far more complex than jwilder/nginx-proxy but judging from its website presentation, it should have more functionalities than just a simple reverse proxy.
version: "3"

services:
  traefik:
    image: "traefik"
    command:
      - "--api=true"
      - "--api.insecure=true"
      - "--providers.docker=true"
      - "--providers.docker.exposedbydefault=false"
      - "--entrypoints.websecure.address=:443"
      - "--certificatesresolvers.mytlschallenge.acme.tlschallenge=true"
      - "--certificatesresolvers.mytlschallenge.acme.email=${SSL_EMAIL}"
      - "--certificatesresolvers.mytlschallenge.acme.storage=/letsencrypt/acme.json"

    labels:
      - traefik.enable=true
      - traefik.http.routers.n8n.rule=Host(`${SUBDOMAIN}.${DOMAIN_NAME}`)
      - traefik.http.routers.n8n.tls=true
      - traefik.http.routers.n8n.entrypoints=websecure
      - traefik.http.routers.n8n.tls.certresolver=mytlschallenge
      - traefik.http.middlewares.n8n.headers.SSLRedirect=true
      - traefik.http.middlewares.n8n.headers.STSSeconds=315360000
My Docker Compose codes are not perfect yet. For example, I failed to use networks: and have not figure out how to connect to FastCGI backend with VIRTUAL_PROTO=fastcgi for php-fpm which can be found under FastCGI Backends for nginx-proxy at GitHub. I would also like tweak nginx and mysql config for security and performance if my website gets more traffic. But for now, I just want to spin up my WordPress and continue to write my posts… until when I feel there is a need to revisit this topic.
Thanks for your posting. I am currently on the same path like you.
In step 3 you mention that the containers behind the proxy should not run with nginx? Did I get that right?
I am currently facing the same issue. If the containers behind the proxy run with apache everything works properly. But if i switch them to nginx I receive a “502 Bad Gateway” error message.