Introduction
There are several mail transfer agents (MTA) for Linux, like Sendmail, Postfix, and Exim. Sendmail is one of the oldest MTAs available, but it does have some drawn-out configuration steps and is too large in my opinion. The lightweight Exim was deployed as send-only SMTP for ease of convenience because it comes with a default Debian installation. But in the last few years, I’ve been using Postfix in all my Ubuntu, Debian, and CentOS setups because it has more capabilities than Exim and isn’t as slow as Sendmail. There are just as many tutorials online for Postfix as there are for Sendmail.
Background
There exist numerous guides on how to configure Postfix as a send-only SMTP server, and there are also main.cf config samples available on GitHub as references. Thus, I shall refrain from reinventing the wheel. Instead, this guide shows you how to set up a Canonical maps rewriting and sender dependent SASL authentication. You can use the Canonical table to send an email from a bash terminal with username@hostname but mapped to sender@domain. SASL dependent is when you have multiple email accounts with different domains as senders (sender@domain1 and sender@domain2) for different tasks, but you have a single relay host.
1. Install Postfix
Installing Postfix is straightforward, and there are plenty of tutorials on how to do it. Below is for the AlmaLinux 9.4 (Seafoam Ocelot) distro.
# Update package index
$ sudo dnf update

# Install Postfix
$ sudo dnf install postfix

# -bash: mail: command not found and not available for RHEL 9
$ sudo dnf install mailx

# mailx was replaced by s-nail for RHEL 9
$ sudo dnf install s-nail

# Missing /var/log/mail.log for AlmaLinux 9.4
$ sudo postconf maillog_file=/var/log/mail.log

# Enable and Start Postfix
$ sudo systemctl enable postfix
$ sudo systemctl start postfix
Need libsasl2-modules (cyrus-sasl) or ssl-cert (snakeoil)?
Before you attempt to install any of the authentication modules that deploy SASL API implementation or follow other tutorials that include configs smtpd_tls_cert_file and smtpd_tls_key_file, please check if /etc/postfix/main.cf already has the following configurations included. My default Postfix installation without libsasl2-modules already includes these:
$ vi /etc/postfix/main.cf
smtpd_tls_cert_file = /etc/pki/tls/certs/postfix.pem
smtpd_tls_key_file = /etc/pki/tls/private/postfix.key
smtp_tls_CApath = /etc/pki/tls/certs
smtp_tls_CAfile = /etc/pki/tls/certs/ca-bundle.crt
You can try these possible solutions if you’re missing anything above for some reason. The smtp_tls_CAfile has more examples, so let’s try using it before the smtpd_tls_cert_file solution with snakeoil.
# Try this first if available for your distro
$ apt-get install libsasl2-modules

# Else, for AlmaLinux 9.4
$ dnf install cyrus-sasl
If the ca-certificates.crt file is present, then add smtp_tls_CAfile = /etc/ssl/certs/ca-certificates.crt to main.cf. If not present, then search for the ca-bundle.trust.crt file, you can either do a soft link ln -s or include the full path in smtp_tls_CAfile = /full/path/to/file. If none of these methods worked for you, you may want to try this uncommon method of installing the ssl-cert package to use ssl-cert-snakeoil.pem and ssl-cert-snakeoil.key
# crt file present?
$ ls -l /etc/ssl/certs/ca-certificates.crt

# If yes, add to /etc/postfix/main.cf
smtp_tls_CAfile = /etc/ssl/certs/ca-certificates.crt

# Else, check if present /etc/ssl/certs/ca-bundle.trust.crt
$ ln -s /etc/ssl/certs/ca-bundle.trust.crt /etc/ssl/certs/ca-certificates.crt
smtp_tls_CAfile = /etc/ssl/certs/ca-bundle.trust.crt

# If all else fails, try snakesoil
$ sudo apt install ssl-cert
smtpd_tls_cert_file=/etc/ssl/certs/ssl-cert-snakeoil.pem
smtpd_tls_key_file=/etc/ssl/private/ssl-cert-snakeoil.key
2. Configure Relay Host with External SMTP Server
A simple mail command to send an email from the terminal to Gmail won’t work if you just install Postfix out of the box. There are legitimate reasons for not having set up SPF and DKIM properly, but we will put them aside for now as we attempt to resolve the ‘sender is unauthenticated‘ issue below.
# After Postfix is installed and configured without relay host
$ echo 'hello world' | mail -s 'email test' user@gmail.com

$ tail -f /var/log/mail.log
status=bounced (host gmail-smtp-in.l.google.com[142.250.157.27] said: 550-5.7.26 Your email has been blocked because the sender is unauthenticated. 550-5.7.26 Gmail requires all senders to authenticate with either SPF or DKIM.
The following few smtpd_xx lines should be added to /etc/postfix/main.cf under the TLS CONFIGURATION section. We will be using myrelayhost.mxrouting.net at port 587 as our relay host.
- smtp_sasl_auth_enable
- smtp_sasl_password_maps
- smtp_sasl_security_options
- smtp_use_tls
- smtpd_tls_security_level
## Add to TLS CONFIGURATION section
# Enable SASL authentication
smtp_sasl_auth_enable = yes
# List of email logins username:password
smtp_sasl_password_maps = hash:/etc/postfix/sasl_passwd
# Disable anonymous authentication
smtp_sasl_security_options = noanonymous
# Enable STARTTLS encryption
smtp_use_tls = yes
# (included in main.cf) with default =may or go for =encrypt
smtpd_tls_security_level=may

## Add your [SMTP relay host]:port to # INTERNET OR INTRANET section
relayhost = [myrelayhost.mxrouting.net]:587
In the /etc/postfix/sasl_passwd file, add the email login username and password and the relay host with square brackets. Next, create Postfix lookup tables using the command postmap.
$ vi /etc/postfix/sasl_passwd
[myrelayhost.mxrouting.net]:587 sender@yourdomain.com:password

$ postmap /etc/postfix/sasl_passwd
#  Restrict access to only root
$ chown root:root /etc/postfix/sasl_passwd /etc/postfix/sasl_passwd.db
$ chmod 0600 /etc/postfix/sasl_passwd /etc/postfix/sasl_passwd.db

$ sudo systemctl restart postfix
3. First Outgoing Email Test via Relay Host
The above tasks will allow us to send an email via our relay host at the terminal. We are using the email account details in the sasl_passwd file to authenticate with our external SMTP provider relayhost to send the email. As demonstrated in numerous other online tutorials, this should work, or else you should verify the details of your email account.
$ sendmail -f sender@yourdomain.com -t <<EOF
To: recipient@gmail.com
Subject: Hey, I successfully configured Postfix!
Content-type: text/html

<b>This is awesome!</b>
EOF
4. Send an Email using mail command
There are occasions when a developer like myself needs to use the mail command to send out email in a bash script. A common if-else example will be like:
#! /bin/sh
if [ condition ]
then
echo 'Failure: xyz reason' | mail -s 'Test Failed' recipient@gmail.com
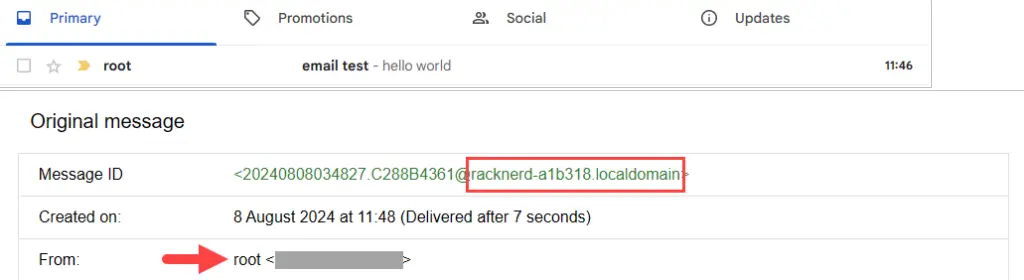
fiLet’s try again, sending an email with echo 'Failure: xyz reason' | mail -s 'Test Failed' recipient@gmail.com. The status indicates sent (status=send); however, the email did not reach the intended recipient. This is because the email is sent from root@racknerd-a1b318.localdomain in the Linux bash terminal, and it is not listed in the sasl_passwd file. It makes no sense to create a non-domain email address such as root@hostname, even if it is possible with your SMTP provider.

Add -r “sender email”
As mentioned in the Mailutils manual, (-r or –return-address) sets the return email address for outgoing mail. Therefore, the resolution is to incorporate the email address that appears on the /etc/postfix/sasl_passwd list, as depicted below.$ echo 'Failure: xyz reason' | mail -s 'Test Failed' -r 'sender@yourdomain.com' recipient@gmail.com Note: This test worked for mail (GNU Mailutils) 3.7
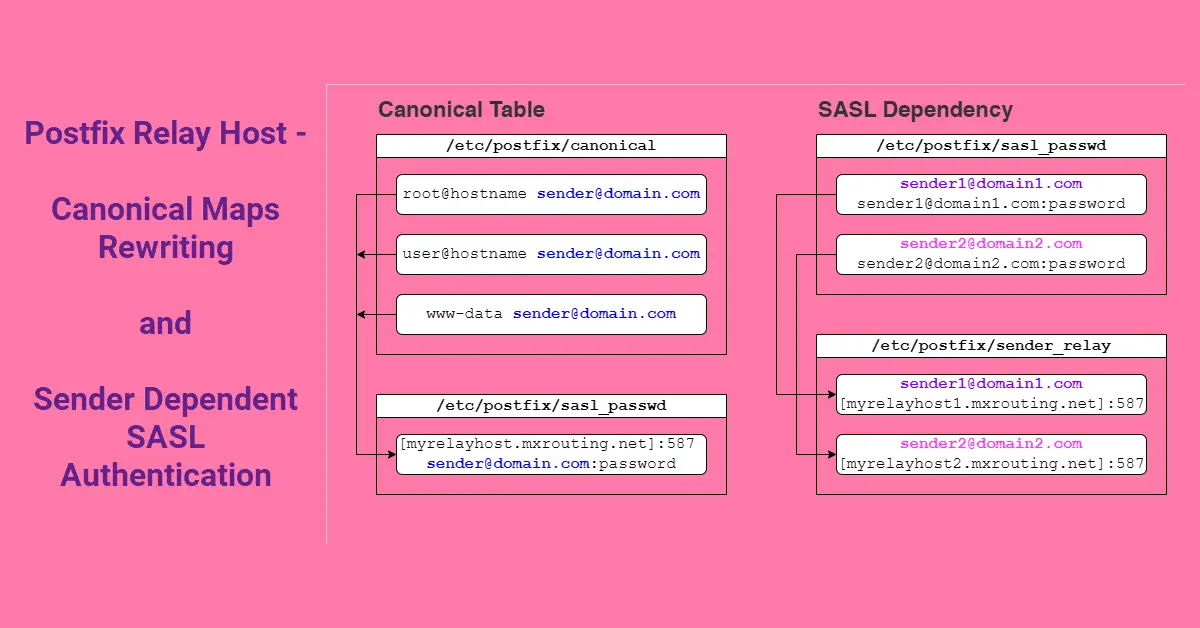
Canonical Table for Rewriting Addresses
Another way to resolve this problem is to make a canonical table for Linux users that maps to the valid SMTP email address in the existing /etc/postfix/canonical file, and include this new file in /etc/postfix/main.cf. If there are a total of 10 bash scripts, this approach can prove advantageous as it only necessitates modifying the canonical file once, as opposed to having to update the mail command with -r 'user@hostname' for each script. Another plausible explanation could be that the script does not expose any email addresses.
# Add to top of existing canonical file
$ vi /etc/postfix/canonical
root@racknerd-a1b318.localdomain sender@yourdomain.com
user1@racknerd-a1b318.localdomain sender@yourdomain.com
www-data sender@yourdomain.com

# Create canonical lookup table
$ postmap /etc/postfix/canonical

# Add to bottom /etc/postfix/main.cf
sender_canonical_maps = hash:/etc/postfix/canonical

$ sudo systemctl restart postfix
We restarted Postfix and tried to send an email again, but this time we got it. The From: is root because the mail command was executed by the root user. If you have added user1@hostname in the canonical file and executed the mail command as user1, then the email From: will be user1.
5. Hosting Multiple Domains Email Accounts
Numerous web administrators, including myself, operate multiple websites on a single server. What if a cron job is required to send emails from domain1 to the respective clients, and another from domain2 to the respective clients? Yes, we can add multiple email accounts to /etc/postfix/sasl_passwd, but it will result in a postmap duplicate entry warning below.
$ vi /etc/postfix/sasl_passwd
[myrelayhost.mxrouting.net]:587  sender1@yourdomain1.com:password
[myrelayhost.mxrouting.net]:587  sender2@yourdomain2.com:password

$ postmap sasl_passwd
postmap: warning: sasl_passwd.db: duplicate entry: "[myrelayhost.mxrouting.net]:587"
Add more email accounts to /etc/postfix/sasl_passwd, but now differently compared to Step 2, and create a new mapping file /etc/postfix/sender_relay like this:
- sender1@yourdomain1.com (sasl_passwd) → (sender_relay) [myrelayhost.mxrouting.net]:587
- sender2@yourdomain2.com (sasl_passwd) → (sender_relay) [myrelayhost.mxrouting.net]:587
(link) smtp_sender_dependent_authentication (default: no)
Enable sender-dependent authentication in the Postfix SMTP client; this is available only with SASL authentication, and disables SMTP connection caching to ensure that mail from different senders will use the appropriate credentials.
This feature is available in Postfix 2.3 and later.
# Does not include relay host anymore
$ vi /etc/postfix/sasl_passwd
 sender1@yourdomain1.com  sender1@yourdomain1.com:password
 sender2@yourdomain2.com  sender2@yourdomain2.com:password

# Map emails to relay host in a new file
$ vi /etc/postfix/sender_relay
sender1@yourdomain1.com  [myrelayhost.mxrouting.net]:587
sender2@yourdomain1.com  [myrelayhost.mxrouting.net]:587

$ postmap sasl_passwd sender_relay

# Add to main.cf to set up sender-dependent SASL authentication
$ vi /etc/postfix/main.cf
# sender-dependent sasl authentication
smtp_sender_dependent_authentication = yes
sender_dependent_relayhost_maps = hash:/etc/postfix/sender_relay

$ systemctl restart postfix
We’ll send test emails from two different email domain accounts after restarting postfix. Note: It is likely that the (/etc/postfix/sender_relay) file could contain multiple relayhost sources from different SMTP providers.
$ sendmail -f sender1@yourdomain1.com -t <<EOF
To: recipient@gmail.com
Subject: Postfix with sender-dependent SASL authentication 1
Content-type: text/html

<b>This is truly astonishing!</b>
EOF

$ sendmail -f sender2@yourdomain2.com -t <<EOF
To: recipient@gmail.com
Subject: Postfix with sender-dependent SASL authentication 2
Content-type: text/html

<b>This is truly wonderful!</b>
EOF
Conclusion
It is easy to create email accounts in cPanel or DirectAdmin and use them as it is already set up. However, you may wish to consider upgrading your hosting requirements to a Virtual Private Server (VPS) to obtain additional resources and exercise greater control over deployed applications such as Apache/Nginx and MySQL. Therefore, it is necessary to establish your own Managed Transfer Agent (MTA) on the server. Postfix has a more diverse starting base configuration and can expand its features, such as canonical and sender-dependent SASL authentication. There are many online guides on how to install and configure Postfix to use an external SMTP relay, which only requires a few lines of code changes to /etc/postfix/main.cf. Always refer to the /var/log/mail.log to debug email queue issues. It is essential to add SPF and DKIM as TXT records to your DNS for new domain email setup, to improve email deliverability.