
Introduction
This is the fourth and final “Infrastructure as Code” article from my DevOps learning journey. Previously, I had wrote about Docker, Ansible and Docker Swarm. Today, I am going to introduce Terraform, an open-source ‘Infrastructure Provisioning‘ tool created by HashiCorp. It is widely used in DevOps operations to deploy or change cloud infrastructure rapidly and efficiently. The content written here is largely based on the official Terraform tutorial on ‘Get Started – AWS’ which can be found here.
Prerequisites
If you are using Visual Studio Code editor, you can install HashiCorp Terraform extension for syntax highlighting and auto-completion for terraform (*.tf) files.
While Terraform supports major cloud services like AWS, Microsoft Azure and Google Cloud, we will learn to deploy our infrastructure with AWS in this tutorial. Hence, we will need to have both AWS account and AWS CLI installed in our local server. AWS CLI is required to configure AWS credentials to our local server so that terraform apply can work or else we will get Error: No valid credential sources found for AWS Provider. To install AWS CLI version 2 on Linux x86 (64-bit):
curl "https://awscli.amazonaws.com/awscli-exe-linux-x86_64.zip" -o "awscliv2.zip"
unzip awscliv2.zip
sudo ./aws/install

$ aws --version
aws-cli/2.0.35 Python/3.7.3 Linux/5.4.0-42-generic botocore/2.0.0dev39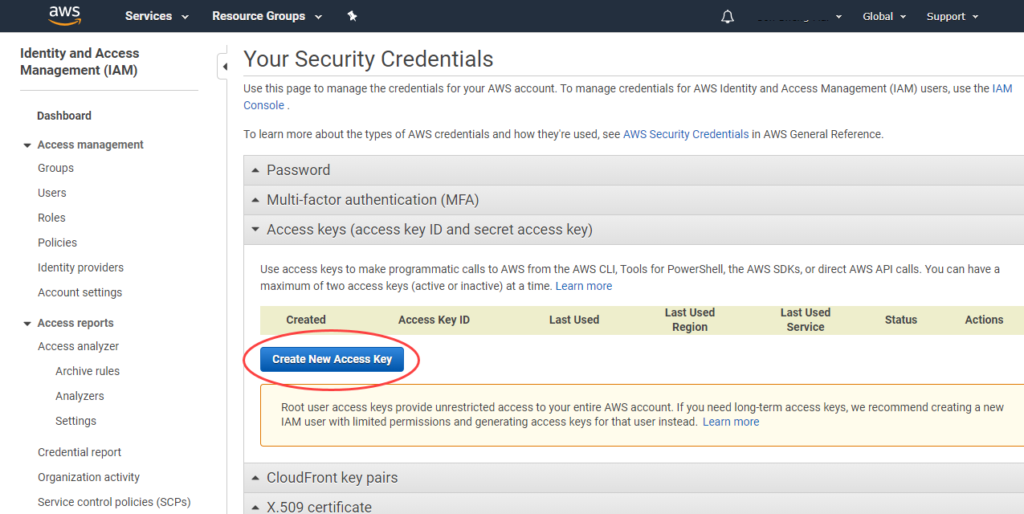
Log in to AWS console to generate or get your AWS Access credentials from here before we run aws configure to set our AWS Access Key ID and Secret Access Key.
$ aws configure
AWS Access Key ID [None]: AKIAJWTYLGOLTGCHelloWorld
AWS Secret Access Key [None]: csosIDCRsKFcIi/1LdPq7po0COQZS9crhRHelloWorld
Default region name [None]:
Default output format [None]:
Step 1 – Install Terraform CLI
Download Linux (64-bit) from Terraform download webpage and unzip it to our Terraform deployment server. It only contains a single binary executable file terraform. Do the following steps to ensure that terraform binary is available on our PATH.
# Method 1 - Make terraform available for all users
$ mv ~/Downloads/terraform /usr/local/bin/

# Method 2 - Make terraform available for single user E.g. admin
# Log in to admin account and add export PATH to bottom of .profile
$ vi .profile
export PATH="$PATH:~/path-to-downloads/terraform"
To let the changes take effect without having to re-log and to test if terraform was successful installed.
$ source ~/.profile
$ terraform --version
Terraform v0.12.29
Step 2 – Test Launch an EC2 Instance
Create a Terraform project directory (e.g. aws-infra) and vi config.tf file which will store all the infrastructure as code codes.
$ mkdir ~/aws-infra
$ vi ~/aws-infra/config.tf

# Launch an EC2 instance
$ cd ~/aws-infra
~/aws-infra$ terraform init
~/aws-infra$ terraform apply
# config.tf
provider "aws" {
profile = "default"
region = "us-east-1"
}
resource "aws_instance" "example" {
ami = "ami-2757f631"
instance_type = "t2.micro"
}We must first run terraform init once whenever we create a new Terraform project folder. This is to initialize a working directory containing Terraform configuration files. Run terraform apply to deploy an EC2 instance to us-east-1 region. To sum up, the steps to use Terraform is to run these in sequence (assuming AWS CLI and Terraform are installed): Create a working directory > Create a .tf file > terraform init > terraform apply. To destroy deployed assets, we simply use terraform destroy.
Step 3 – Define Input Variables
Just like Ansible, Terraform allows us to define variables in a *.tf file, for example, variables.tf and assign values to these variables in a *.tfvars file, for example, terraform.tfvars. We do not always require to use a *.tfvars file if if we had declared ‘default‘ when we define the variable in the *.tf file. When we use both files, the assigned value will take precedence over the default.
# config.tf
provider "aws" {
  profile = "default"
  region = var.region
}

# variables.tf
variable "region" {
  default = "us-east-1"
}

# terraform.tfvars
region = "us-west-2"
In this case, the final value of region will be ‘us-west-2‘ or ‘us-east-1’ if terraform.tfvars is absent. We are no longer hard-coding and the terraform configuration can truly be shared across our infrastructure deployments. There are other parameters to set such as ‘test‘ and ‘description‘ – all these details can be found here.
Step 4 – Resource Dependencies
In this example, we assign an elastic IP to the newly created EC2 instance using resource “aws_eip” “ip”. This does not require the depends_on code because Terraform is smart enough to get the ‘id’ from the ‘aws_instance.example‘ resource. However, if we are planning to use Amazon S3 bucket on our EC2 instance, we will need to use depends_on to explicitly declare the dependency.
# config.tf
# New resource for the S3 bucket our application will use.
resource "aws_s3_bucket" "example" {
  # NOTE: S3 bucket names must be unique across _all_ AWS accounts, so
  # this name must be changed before applying this example to avoid naming
  # conflicts.
  bucket = "terraform-getting-started-852020" # Rename unique S3 global
  acl    = "private"
}

resource "aws_instance" "example" {
  key_name      = aws_key_pair.example.key_name
  ami           = var.amis[var.region]
  instance_type = "t2.micro"

  # Tells Terraform that this EC2 instance must be created only after the
  # S3 bucket has been created.
  depends_on = [aws_s3_bucket.example]
}

# Assign Elastic IP
resource "aws_eip" "ip" {
    vpc = true
    instance = aws_instance.example.id
}
Step 5 – Provision Infrastructure
# config.tf
resource "aws_key_pair" "example" {
  key_name   = "examplekey"
  public_key = file("~/.ssh/id_rsa.pub") # Change this
}

resource "aws_instance" "example" {
  key_name      = aws_key_pair.example.key_name
  ami           = var.amis[var.region]
  instance_type = "t2.micro"

  provisioner "local-exec" {
    command = "echo ${aws_instance.example.public_ip} > ip_address.txt"
  }

  connection {
    type        = "ssh"
    user        = "ec2-user"
    private_key = file("~/.ssh/id_rsa") # Change this
    host        = self.public_ip
  }

  provisioner "remote-exec" {
    inline = [
      "sudo amazon-linux-extras enable nginx1.12",
      "sudo yum -y install nginx",
      "sudo systemctl start nginx"
    ]
  }
}
To define a provisioner, we add a provisioner block within the resource block. The local-exec requires no other configuration and need not connect to the remote server (EC2) unlike remote-exec. A ip_address.txt file will be generated on the local host when after we run terraform apply.
user@devops:~/terraform/aws-infra$ ls -l
total 16
-rw-rw-r-- 1 user user 347 Aug  2 22:54 config1.tf
-rw-rw-r-- 1 user user 14 Aug  2 22:56 ip_address.txt
-rw-rw-r-- 1 user user 3140 Aug  2 22:56 terraform.tfstate
-rw-rw-r-- 1 user user 158 Aug  2 22:56 terraform.tfstate.backup
user@devops:~/terraform/aws-infra$ cat ip_address.txt
100.25.215.18
We use ‘provisioners’ to initialize instance that we have created. This is somehow similar to Ansible where we attempt to login to the instance we had created and run command line to execute tasks such as install Linux packages with yum or apt-get. In above example,
- We generate a SSH public key on our local server.
- Create resource aws_key_pair and point the public_key to id_rsa.pub normally at /home/user/.ssh/
- Create an EC2 instance with the key_name we created in Step 2.
- Initiate a SSH connection from local to EC2 instance using public and private key.
- On successful connection, install nginx using yum install
Step 6 – Putting All Together
terraform config file – config.tf
# config.tf
provider "aws" {
  region = var.region
}

resource "aws_key_pair" "example" {
  key_name   = "examplekey"
  public_key = file("~/.ssh/id_rsa.pub") # Change this
}

# New resource for the S3 bucket our application will use.
resource "aws_s3_bucket" "example" {
  # NOTE: S3 bucket names must be unique across _all_ AWS accounts, so
  # this name must be changed before applying this example to avoid naming
  # conflicts.
  bucket = "terraform-getting-started-852020" # Rename unique S3 global
  acl    = "private"
}

resource "aws_instance" "example" {
  key_name      = aws_key_pair.example.key_name
  ami           = var.amis[var.region]
  instance_type = "t2.micro"

  # Tells Terraform that this EC2 instance must be created only after the
  # S3 bucket has been created.
  depends_on = [aws_s3_bucket.example]

  provisioner "local-exec" {
    command = "echo ${aws_instance.example.public_ip} > ip_address.txt"
  }

  connection {
    type        = "ssh"
    user        = "ec2-user"
    private_key = file("~/.ssh/id_rsa") # Change this
    host        = self.public_ip
  }

  provisioner "remote-exec" {
    inline = [
      "sudo amazon-linux-extras enable nginx1.12",
      "sudo yum -y install nginx",
      "sudo systemctl start nginx"
    ]
  }
}

# Assign Elastic IP
resource "aws_eip" "ip" {
    vpc = true
    instance = aws_instance.example.id
}
Declare variables file – variables.tf
# variables.tf
variable "region" {
  default = "us-east-1"
}

output "ip" {
  value = aws_eip.ip.public_ip
}

variable "amis" {
  type = map
  default = {
    "us-east-1" = "ami-0bcc094591f354be2"
    "us-west-2" = "ami-0a634ae95e11c6f91"
  }
}
Assign values to variables file – terraform.tfvars
# terraform.tfvars
region = "us-west-2"

amis = {
  "us-east-1" = "ami-02354e95b39ca8dec"
  "us-west-2" = "ami-04590e7389a6e577c"
}- Set AWS region to us-west-2
- Create a key_pair with local public key id_rsa.pub
- Create a S3 bucket with unique name terraform-getting-started-852020
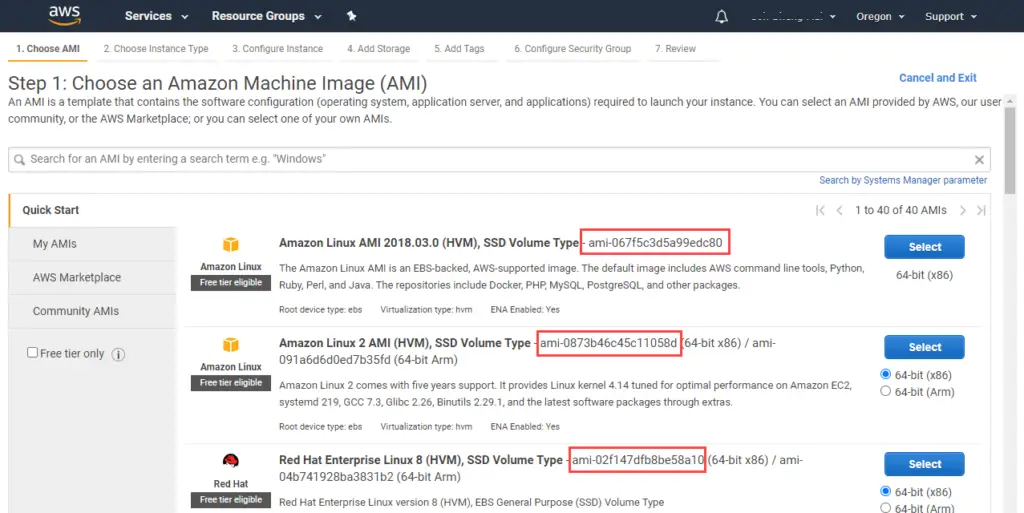
- Create EC2 instance with Amazon Machine Images (AMI) – ami-0a634ae95e11c6f91 which overwrite the default ami-067f5c3d5a99edc80
- Create ip_address.txt on local server which contains the EC2 instance IP.
- Establish SSH connection to EC2 instance with local private key.
- Execute yum to install nginx
- “aws_eip” “ip” provides an Elastic IP to the EC2 instance.
- Define output “ip” for ip so that after teraform apply, the console will display the IP address. We can also type $terraform output ip to show the IP address.
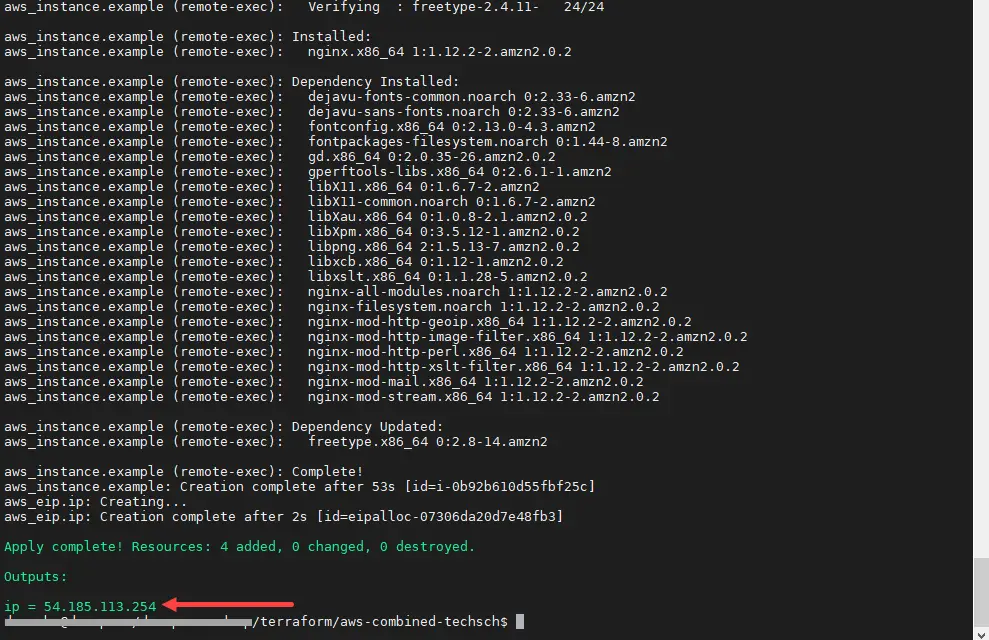
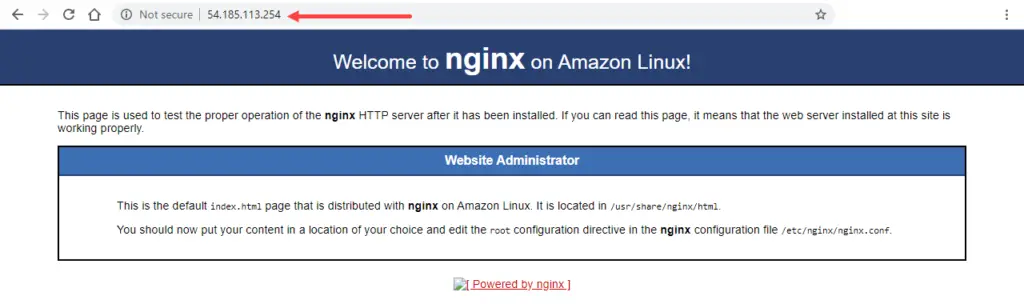


S3 bucket (terraform-getting-started-852020) and EC2 instance (us-west-2) with IP address 54.185.113.254 deployed in AWS! NGINX was installed successfully as the default webpage can be loaded from a browser.
Conclusion
We had caught a glimpse of what it means for Infrastructure as Code with Terraform. We had learned to install AWS CLI and Terraform on our local server. Then we wrote terraform configuration file (config.tf) to create EC2 instance using variables defined in (variables.tf) file. When the default values are not suited, we tried to create a variables value file (terraform.tfvars) to assign values to our variables. When the infrastructure is up and running, terraform can remote in to do stuffs like install a web-server. We can also collapse the entire infrastructure with single command terraform destroy. I think it is pretty cool to use a combination of Terraform with Ansible, for example, use Terraform to ‘orchestrate’ a number of instances and Ansible to configure manage them.