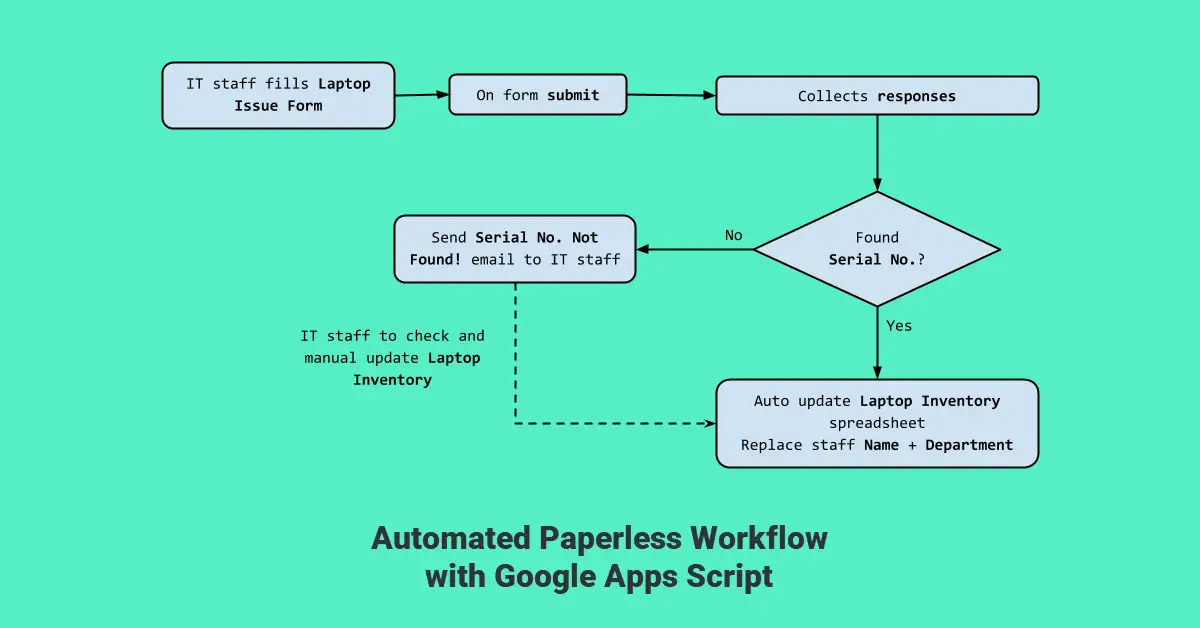
Introduction
I have been using Google Drive to create various docs and spreadsheets to store my notes for the past 10 years. Due to the COVID-19 pandemic, my company had embarked on a few digitization projects and one of them was “paperless” workflow. As I worked in the IT department, I been tasked to convert the staff laptop assignment procedure into paperless. Some open-source software that I experimented with, for example, Snipe-IT can meet the requirements to replace both the process and hard copy form that we used. However, I changed my mind when I learned that responses collected from Google forms can be used to update spreadsheet with Google Apps Script and it even have the ability to send out emails. For this tutorial, we will discover how to develop an automated workflow with Google Apps Script.
Prerequisites
A personal free Google account or subscribed G Suite Business plan. Able to create basic forms and spreadsheets from Drive and some hands-on with JavaScript coding because Google Apps Script is based on JavaScript syntax.
Step 1 – Create a Laptop Asset Inventory Spreadsheet

Sign in to your Google account as we need to create a simple laptop inventory list like the one above. All the columns are of fixed values except column “Name” and “Department” which will be updated with data collected from the laptop issue form.
Step 2 – Create a Laptop Issue Form with Responses Spreadsheet
Go to Forms at this URL – https://docs.google.com/forms/u/0/ to start a new form. Let’s create a simple Laptop Issue Form.
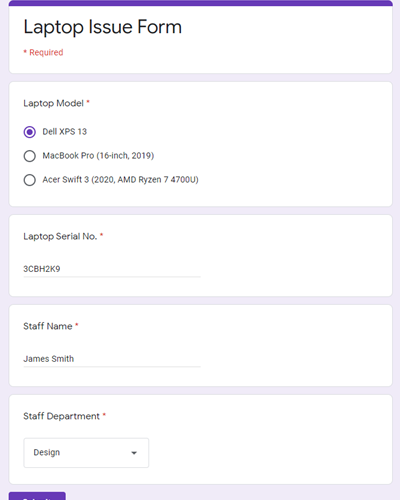
Your issuance form can have more questions than this but the three required fields for this tutorial are Serial No., Staff Name and Staff Department. This is because Serial No. will be used to identify which laptop in the Laptop Asset spreadsheet to update or replace with the Staff Name and Department answers collected.

Next, we go to the form Responses tab and click Create Spreadsheet so that Google will write existing collected and future responses into this spreadsheet.
Step 3 – Add Trigger to Run Functions on Event Type

We have now a spreadsheet that will automatically get filled with answers with each successful form submission. Next, we will set up an event trigger to update our Laptop Asset spreadsheet. This event trigger will activate whenever a new row of data is added to the “Responses” spreadsheet.
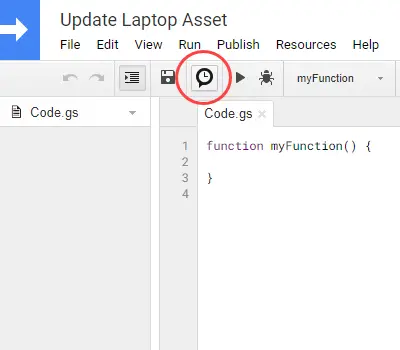

Open the Laptop Issue Form (Responses) spreadsheet and go to Tools > Script editor. Next, click on the stopwatch icon (when mouse over, it says Current project’s triggers). Enter a new project name, for example, “Update Laptop Asset”. Click the Add Trigger button and change the last drop-down Select event type to On form submit. Then you will be prompt to choose a Google account and allow permissions to continue.
Step 4 – Read Responses and Update Laptop Asset Spreadsheet on New Form Submission
function onFormSubmit(e) {
  var spreadsheet = SpreadsheetApp.getActive(); // this spreadsheet
  var responseSheet = spreadsheet.getSheetByName('Form Responses 1'); // name of sheet

  // Returns the position of the last row that has content.
  var rLastRow = responseSheet.getLastRow();
  // Returns the position of the last column that has content.
  var lastCol = responseSheet.getLastColumn();

  // Store row answers into array
  var values = responseSheet.getRange(rLastRow, 1, 1, lastCol).getValues()[0];

  var timestamp = Utilities.formatDate(new Date(values[0]), Session.getScriptTimeZone(), 'yyyy-MM-dd');
  var product = values[1];
  var serialNo = values[2]; // IMPORTANT! Serial No. as unique key to update Asset Laptop spreadsheet
  var financeNo = values[3];
  var hostname = values[4];
  var transDate = values[5];
  var emailIT = values[6];
  var email = values[7];

  updateMasterAsset(serialNo, name, dept, emailIT);
}

function updateMasterAsset(serialNo, name, dept, emailIT) {
  //var serialNo = '5CD19B6H'; // debugging
  //var name = 'Jennifer'; // debugging
  //var emailIT = 'your.email@company.com'; // debugging

  // ID of Laptop Asset Inventory spreadsheet
  var sss = SpreadsheetApp.openById('1e4cJf6EDN_UM0aDKCG4oGc_WjEFGb3w4SwnlX');
  // Replace with Sheet tab name
  var copyToSheet = sss.getSheetByName('Master');
  var data = copyToSheet.getDataRange().getValues();

  // i = row
  var matched = 0;
  for (var i = 0; i < data.length; i++) {
    // Column G = Serial No | Column A = [0]
    if (data[i][6] == serialNo) {
      // Replace Name/ Department and i+1 because spreedsheet 1st row = 1 but i = 0
      copyToSheet.getRange('B' + (i+1)).setValue(name); // update Column B
      copyToSheet.getRange('C' + (i+1)).setValue(dept); // update Column C

      var matched = 1;
    }
    SpreadsheetApp.flush(); // IMPORTANT! to apply all changes right away
  }

  //Logger.log(matched); // debugging

  // Send an HTML email to IT staff if Serial No. not found in Laptop Asset Inventory
  if (!matched) {
    var subject = 'Laptop Serial No. NOT FOUND!';

    var htmlBody = 'Dear IT staff,';
    htmlBody += '<p>This is to notify that update to Master Asset list has <strong>FAILED</strong> because Serial No. <strong>' + serialNo + '</strong> cannot be found.';
    htmlBody += '<br>Please double check <a href="https://docs.google.com/spreadsheets/d/1e4cJf6EDN_UM0aDKCG4oGc_WjEFGb3w4SwnlX/edit#gid=1636734107/edit" target="_blank">Laptop Asset Inventory</a> and Serial No. and update manually.';
    htmlBody += '</p>';
    htmlBody += '<p>Thank you.</p>';
    htmlBody += '<p>Regards,<br>Google Apps Scripts</p>';

    GmailApp.sendEmail(emailIT, subject, 'Please take note.', {htmlBody:htmlBody})
  }
}
What we had coded here is to read the last row data into an array “values” whenever there is new entry to the spreadsheet. We can use these values as function parameters that could, for example, update another spreadsheet or send out an email.
We will invoke the function updateMasterAsset() to use the collected form data to update the Laptop Asset Inventory spreadsheet in Step 1. Within this function, we will also send out an email to inform the IT staff and request that he/she check and update the asset spreadsheet manually if the laptop serial no. is not found in the asset spreadsheet.
SpreadsheetApp.flush() is an important piece of code to make sure all pending changes are made right away to ensure the process flow seamlessly. Operations are sometimes stacked together and performed after one another to improve performance. However, in most situations, we require that the script execute the changes and immediately pass the results into other functions or scripts to continue the process. Otherwise, other functions or scripts will just continue to execute without the results and the workflow will be incorrect.
Conclusion
I am actually quite surprised at how useful and easy to use Google Apps Script to empower multiple spreadsheets into an automated paperless workflow. The automation part is when the form responses are updated to the asset spreadsheet and the IT staff no longer had to do manual entry. Also, any missing laptop serial no. is detected and a notification email will be sent to IT staff. The Google form itself is sufficient and replaces the need to print out hard-copies hence “paperless”. All these minor executions could be part of a larger workflow designed for your company. Best of all, there is no need to extend Google Forms functionality with third-party add-ons plus the whole workflow setup is free!