Introduction
It was my first attempt to use Laravel email verification to build an online web application and I shortlisted Fortify for account authentication as it provides register new and login pages out of the box. These two pages were sufficient for me to develop my application and when it was finally time to push for production, it got me thinking what if abusive users create temporarily email accounts and utilize my web app resources extensively? You see, I offered a free subscription plan with certain restrictions and they can exploit this. Therefore, I want only legitimate people to come to sign up for an account. Before we start this tutorial, please note that Laravel offers several options for Authentication in our applications and this tutorial is based on Fortify.
- Fortify – Authentication implementation without Jetstream.
- UI (laravel/ui) – Oldest (legacy) offical and uses Bootstrap.
- Jetstream – Uses Fortify and uses Tailwind instead of Bootstrap. Laravel 8 only.
- Breeze – Updated laravel/ui but uses Tailwind instead of Bootstrap.
Step 1 – Enable Email Verification for Fortify
Uncomment the emailVerification() feature for Fortify.
// config\fortify.php

'features' => [
    Features::registration(),
    Features::resetPasswords(),
    Features::emailVerification(), // <--- this
    Features::updateProfileInformation(),
    Features::updatePasswords(),
    Features::twoFactorAuthentication([
        'confirmPassword' => true,
    ]),
],
Step 2 – Integrate MustVerifyEmail Interface into User class
Add the Illuminate\Contracts\Auth\MustVerifyEmail interface and implements MustVerifyEmail to App\Models\User class.
// app\Models\User.php

namespace App\Models;

use Illuminate\Contracts\Auth\MustVerifyEmail; // <--- this
use Illuminate\Database\Eloquent\Factories\HasFactory;
use Illuminate\Foundation\Auth\User as Authenticatable;
use Illuminate\Notifications\Notifiable;
use Illuminate\Support\Facades\Hash;

class User extends Authenticatable implements MustVerifyEmail // <--- this
//class User extends Authenticatable
{
    use HasFactory, Notifiable;
Step 3 – Ask Fortify to Display Which Blade View
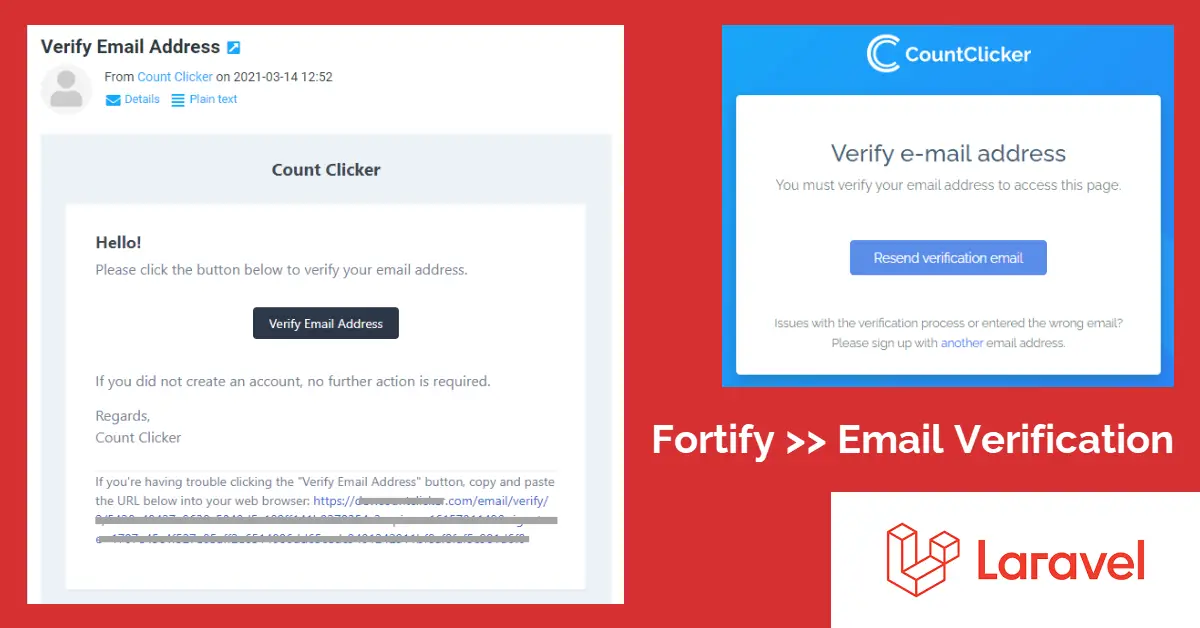
Next, we let Fortify know which view file (usually with 1-2 lines of instructions) we want to show to the users which will inform them to go click the verification link in their email. You may need to create a new blade file for this. For example, auth.verify-email points to resources\views\auth\verify-email.blade.php where auth refers to the directory name.
// app\Providers\FortifyServiceProvider.php

use Laravel\Fortify\Fortify;

class FortifyServiceProvider extends ServiceProvider
{
    public function boot()
    {
        // Email Verification
        Fortify::verifyEmailView(function () { // <--- this
            return view('auth.verify-email');
        });
    }
}
Step 4 – Create a Verify Email Blade View
You will notice that there is a paragraph of text at the bottom asking user to sign up with another email address if they encounter issues with the verification process. In a perfect scenario, a new user registers for an account then receives and clicks on the link in the verification email before getting redirected to the dashboard. However, if the user did not receive the email and want to resend the email verification to another email address instead, he/she will not be able to do so.
This is because the browser will always redirect to verify-email.blade.php even when the user tries to access the registration page at https://example.com/register. The user is forever stuck at the verification page until he/she manages to click the verification link. Poor guy cannot receive email and cannot register for a new account hence he has no choice but to leave your website. To overcome this, we provide a link for them to clear cookie sessions to reach the registration page once more.
// resources\views\auth\verify-email.blade.php
@section('content')
<div class="container">
<div class="row">
<div class="col-md-5 col-sm-12 mx-auto">
<div class="card py-4">
<div class="card-body">
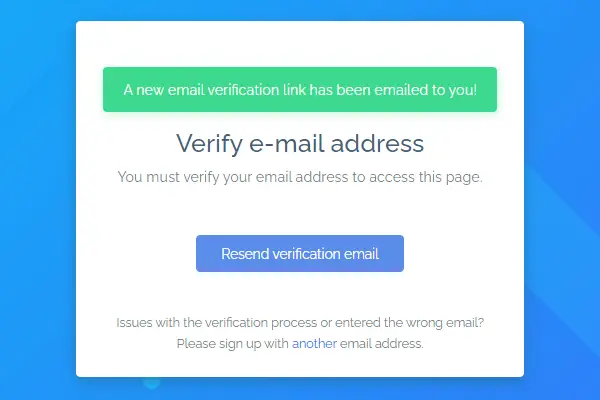
// Inform user after click resend verification email button is successful <--- this
@if (session('status') == 'verification-link-sent')
<div class="alert alert-success text-center">A new email verification link has been emailed to you!</div>
@endif
<div class="text-center mb-5">
// Instructions for new users <--- this
<h3>Verify e-mail address</h3>
<p>You must verify your email address to access this page.</p>
</div>
<form method="POST" action="{{ route('verification.send') }}" class="text-center">
@csrf
<button type="submit" class="btn btn-primary">Resend verification email</button>
</form>
</div>
// Optional: Add this link to let user clear browser cache <--- this
<p class="mt-3 mb-0 text-center"><small>Issues with the verification process or entered the wrong email?
<br>Please sign up with <a href="/register-retry">another</a> email address.</small></p>
</div>
</div>
</div>
</div>
@endsectionStep 5 – Protect Which Route for Verified Users Access Only
Now that we have completed the email verification setup, we ask ourselves what we want to protect in our application. Unverified users should not access these areas if they did not pass the email verification process. For example, all my web application pages are hosted under example.com/dashboard/* and I only want verified users to access my dashboard. To achieve this, we add another middleware ‘verified‘ alongside ‘auth’.
// routes\web.php

//Route::prefix('dashboard')->middleware('auth')->name('dashboard.')->group(function () {
Route::prefix('dashboard')->middleware(['auth', 'verified'])->name('dashboard.')->group(function () {
// To place non-specific routes at bottom! (please update sample routes for your website below)

    Route::post('/clicker/{location_id}', [ClickerController::class, 'update']); // Required for ajax to work with POST method

    /**
     * These are placed at END of web.php or else some specific routes above will NOT work!
     */
    Route::resource('/', DashboardController::class);
    Route::resource('/clicker', ClickerController::class);
    Route::resource('/clickers', ClickerStyleController::class);
    Route::resource('/locations', LocationController::class);
    Route::resource('/users', UserController::class);
});
Bonus Step – Clear Cookie Session in Chrome
If you encounter similar issues like me in Step 4 and do not wish to lose potential sign-ups, we need to add the following codes to web.php for <a href=”/register-retry”> to work. To find out what is your cookie session name, press F12 in Chrome > Application tab > Open Cookies list > Select URL > Name. In my case, the cookie session name is ‘my_first_application_session‘ and normally config(‘app.name’) draws the name from APP_NAME=”My First Application” in .env file. The user will then be redirected to the landing page (not dashboard) and can now access the registration page again!
// routes\web.php

Route::get('/register-retry', function(){
    // Chrome F12 Headers - my_first_application_session=eyJpdiI6ImNnRH...
    Cookie::queue(Cookie::forget(strtolower(str_replace(' ', '_', config('app.name'))) . '_session')); <--- this
    return redirect('/');
 });
Additional Information
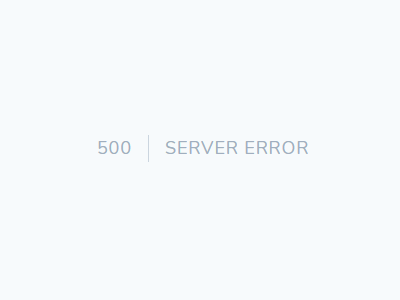
When a user registers with a fake non-existent email address, Laravel development will return 503-No such recipient here (APP_DEBUG=true) and production returns 500 | SERVER ERROR (APP_DEBUG=false).

If you are keen to resolve this, for example, redirect failed SMTP send out to a blade view file instead for a more graceful exit, you can try to make changes to these swiftmailer codes below.
// ./vendor/swiftmailer/swiftmailer/lib/classes/Swift/Transport/AbstractSmtpTransport.php

/** Throws an Exception if a response code is incorrect */
protected function assertResponseCode($response, $wanted)
{
    // ...
    // ...

    if (!$valid) { // <--- this
        $this->throwException(new Swift_TransportException('Expected response code '.implode('/', $wanted).' but got code "'.$code.'", with message "'.$response.'"', $code));
    }
}
While we can also make changes to the default verification email at ./vendor/laravel/framework/src/Illuminate/Auth/Notifications/VerifyEmail.php, but it is not recommended to modify any vendor packages manually as it might cause issues during upgrade.
// ./vendor/laravel/framework/src/Illuminate/Auth/Notifications/VerifyEmail.php

/**
 * Get the verify email notification mail message for the given URL.
 *
 * @param  string  $url
 * @return \Illuminate\Notifications\Messages\MailMessage
 */
protected function buildMailMessage($url)
{
    return (new MailMessage)
        ->subject(Lang::get('Verify Email Address'))
        ->line(Lang::get('Please click the button below to verify your email address.'))
        ->action(Lang::get('Verify Email Address'), $url)
        ->line(Lang::get('If you did not create an account, no further action is required.'));
}
Conclusion
This is my first Laravel tutorial and I picked email verification because it is a must-have feature in most account-based web applications. The steps are easy enough for a novice Laravel coder to follow but I did spend quite some time experimenting with the best way to resolve the user being stuck in the email verification web page problem. In the end, I believed that clearing the cookies is the simplest solution with minimum effort. One issue still bugs my application is when a user registers with an invalid email address and Laravel returns 500 | SERVER ERROR. Lastly, this tutorial is for Laravel Fortify – Jetstream authentication library and not others as mentioned in the Introduction.
I followed your tutorial to set up email verification but the verify-email.blade.php (step 3) wasn’t showed. The registered user was logged in immediately after registering, then, redirected to home (fortify.home). Do you get that issue?
I had the same behaviour. The customized blade is not used. Any Ideas?
I followed you tutorial and I seem not to be able to get an email notification sent to me. I.e. please can the new registration go to their mail program and click the email that we sent. But apart from that everything is working perfectly. Just behind the scenes. I have spent hours now trying to get the auth.verify-email to appear when I click the register button but I am taken directly to the home page (logged on). Then when I go to my mail program the verification email is waiting. Please can you let me know more about your lines above: Route::prefix(‘dashboard’)->middleware([‘auth’, ‘verified’])->name(‘dashboard.’)->group(function () {
I.e. this is unfinished. But I am using these below but same problem.
//Route::get(‘/email/verify’, function (EmailVerificationRequest $request) {
// return view(‘auth.verify-email’);
// })->middleware(‘auth’, ‘verified’)->name(‘verification.notice’);
AND
// Route::get(‘/email/verify’, function () {
// return view(‘auth.verify-email’);
// })->middleware(‘auth’, ‘verified’)->name(‘verification.notice’);
Thank you for your patience, and I have updated the missing Route::prefix lines.
If my memory serves me correctly, the purpose of these lines pertains to the routes that you wish Laravel to enforce log in success before granting user access.