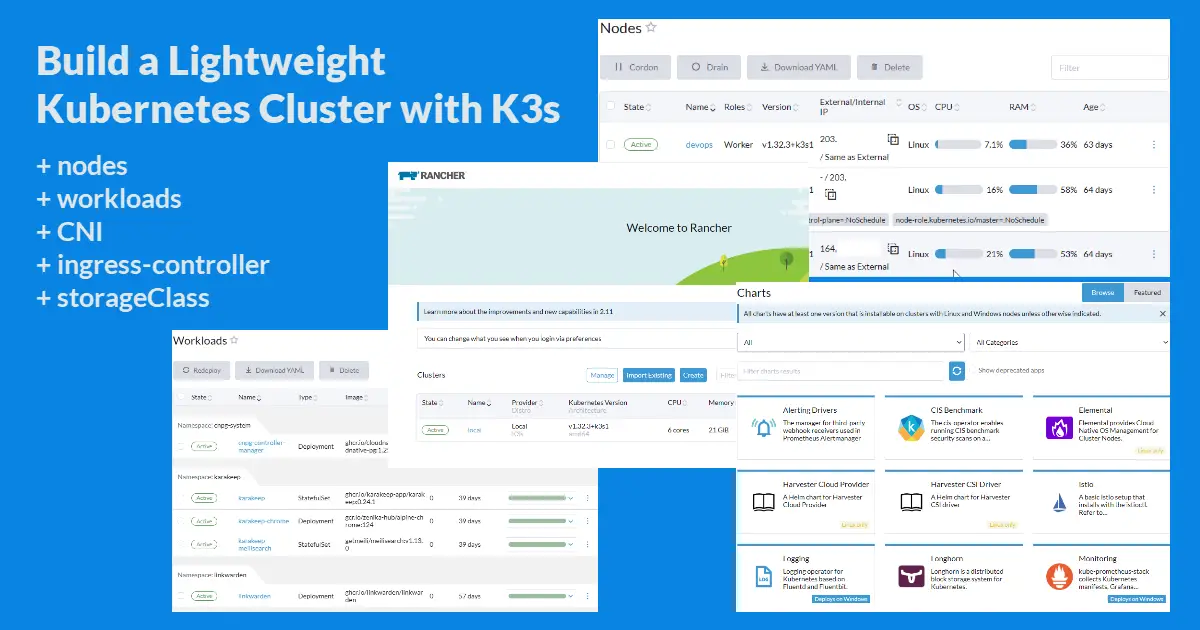
Introduction
In the past decade, there has been a significant shift in the approach to application deployment. Although the pre-COVID-19 period saw companies adopt a hybrid on-premise and cloud approach, the majority of them would now prefer cloud-based Platform as a Service (PaaS). Companies choose the popular Kubernetes cluster or the Red Hat OpenShift variant to deploy their apps more and more these days. This leads us to this tutorial on how to set up a basic Kubernetes distribution for a fraction of the full production cost to self-host apps for family or personal use.
Background
Like many others, I chose to host my WordPress blog using Docker Compose instead of the more common way of installing it into /var/www. Upon reviewing my list of subscribed Virtual Private Servers (VPS), which included one for Docker applications, one for the conventional installation method, one for miscellaneous tasks, and two idle VPS that were originally intended to run AI to predict soccer matches, I realized that I could enhance my technical proficiency by establishing a Kubernetes cluster. Because I worked with OpenShift in my day job, I feel fairly comfortable managing the deployment of apps using helm charts or operators. If I discuss the cluster at my next job interview, it might help.
Self-hosted Kubernetes Distributions
I was contemplating the following Kubernetes distributions: K3s, RKE2, and MicroK8s. Some are more lightweight than others, while others are more production-ready. Each has its own deployment challenges. I know that this will be a personal hobby project that hosts personalized lifestyle apps like a music stream server, bookmark manager, and password manager. Consequently, I went with K3s due to its simplicity, lightweight nature, and near-production-ready distribution, following extensive research with AI chatbots and online articles. RK2, Rancher’s hardened version of production-grade Kubernetes, would be my second pick.
K3s Architecture: Master and Worker Nodes
| No. | CPU (core) | Ram (GB) | HDD (TB) | Bandwidth (TB) | Data Center | Proposed Role | Cost /year |
| 1. | 2 | 8 | 35 | 1.5 | A | Master (taint) | $23 |
| 2. | 4 | 16 | 60 | 3 | A | Worker-1 | $42 |
| 3. | 4 | 16 | 60 | 3 | B | Worker-2 | $42 |
The tables below would explain why I took a week to decide how to deploy my K3s cluster. I can just set up one master and one worker since I have two VPS that aren’t being used, but this gives both the master and the worker a single point of failure. As a result, I acquired a third virtual private server (VPS) to establish a cluster consisting of one master and two workers, which provides some workload resilience. I wanted to run high availability embedded etcd on three master nodes, but my VPS specs aren’t the same. Therefore, I designated the lower performance VPS as the master and set up a 1 master, 2 worker configuration. I applied taint to the master VPS to prevent workloads from being scheduled there because it has limited CPU cores and disk space.
| Decision | Options | Selected : Why |
| Linux Distro | 1. Debian 2. Ubuntu 3. CentOS | I installed Debian on 80% of my VPS but selected Ubuntu 22.04.5 LTS for K3s because I feel that Ubuntu is more widely adopted in production environment, especially for cloud servers. |
| High Availability (HA) | 1. Single-node (default, not HA) 2. HA Embedded etcd 3. External DB | For HA embedded etcd to maintain quorum, a minimum of three master nodes are needed; however, this requirement cannot be optimally met because of varying server specifications. In addition, I don’t want to install and maintain a MySQL/Postgres external database. As a result, I was left with the default option of a single node (not HA). |
| Container Network Interface (CNI) | 1. Flannel (default) 2. Calico 3. Cilium 4. Canal (Calico + Flannel hybrid CNI) | CNI provides networking between pods and some includes Network Policies function. Although Flannel doesn’t have a network policy, it would be excessive for my tiny personal cluster to use Calico or Cilium. Later on, I learned about Canal, which adds Calico’s policy engine to the default K3s Flannel overlay. Note: I did not fully disable Flannel because Canal includes Flannel as the networking layer. However, I’m not running standalone Flannel (default) — instead, K3s installed Canal as the CNI. |
| Ingress Controller | 1. Traefik (default) 2. NGINX Ingress Controller | During my initial attempts to configure K3s, Traefik functioned as expected; however, I ultimately opted for ingress-nginx, which was intuitive to me given that I had previously deployed all of my applications using Linux, Nginx, MySQL, and PHP-FPM (LEMP stack). ChatGPT says that ingress-nginx is Layer 7 (HTTP and HTTPS) and that it handles TLS with the help of the cert-manager and annotations. |
| Load Balancer | 1. Klipper LB (default) 2. MetalLB (external) | It’s not in my plans to buy another VPS just to set up MetalLB. Klipper is a Layer 4 (TCP/UDP forwarding) service that does not support TLS. Every one of my worker nodes has a public IPv4 address. Therefore, I use Ingress-NGINX Controller to expose apps by routing public traffic through the worker node’s public IPv4 address. In other words, my K3s cluster doesn’t have a built-in load balancer like Klipper or MetalLB. |
Step 1 – Install Master Node
Installing K3s cluster is explained in the Quick-Start Guide, and Configuration Options offers more complex configuration choices.
# Default
$ curl -sfL https://get.k3s.io | sh -

# (optional) Canal (Calico + Flannel hybrid CNI)
$ curl -sfL https://get.k3s.io | INSTALL_K3S_EXEC="\
--flannel-backend=none \
--disable-network-policy \
--disable=traefik \
--node-ip=<master IPv4> \
--advertise-address=<master IPv4> \
--tls-san=<master IPv4>,<worker-1 IPv4>,<worker-2 IPv4> \
--write-kubeconfig-mode=644" sh -

# Install Calico (if you use Canal)
$ kubectl apply -f https://raw.githubusercontent.com/projectcalico/calico/v3.29.3/manifests/calico.yamlINSTALL_K3S_EXEC: tells the installer to run the node as a K3s server (i.e., a master/control-plane node)--flannel-backend none: disables the default Flannel CNI because I plan to install Canal CNI – a combination of Flannel (for networking) and Calico (for network policy enforcement)--cluster-cidr=10.244.0.0/16: Pod network CIDR is set to 10.244.0.0/16 (default for flannel usually, but I disabled flannel)--disable traefik: disables the built-in Traefik ingress controller because I plan to install ingress-NGINX--node-ip=<master IPv4>: The node’s IP address explicitly set to this public IP.--advertise-address=<master IPv4>: API server advertises this IP for cluster communication.--tls-san=<master IPv4>,<worker-1 IPv4>,<worker-2 IPv4>: TLS certificates include these IPs as Subject Alternative Names (SANs) — useful if accessing API server from any of these IPs.--write-kubeconfig-mode=644: Sets kubeconfig file permissions to be readable by all users (mode 644).
Secure for User-specific Access vs mode 644 (Optional)
$ sudo vi /etc/rancher/k3s/k3s.yaml
$ sudo k3s kubectl config view --raw > "$KUBECONFIG"
$ chmod 600 "$KUBECONFIG"
Step 2 – Install Canal CNI (Optional)
Install Canal by applying a manifest like this:
$ kubectl apply -f https://docs.projectcalico.org/manifests/canal.yamlStep 3 – Add Worker Nodes
For adding a worker node with this command:
K3S_URL: points to the API server that the worker node will connect to — which runs on the master node.- The worker node needs to know where to join the cluster and communicate with the control plane.
- For single public IP per node (e.g., a VPS): Internal-IP = External-IP = public IP (no private network interfaces)
- <master IPv4> is never exposed at Cloudflare DNS thus EXTERNAL-IP=<none>
# Extract unique node-token from Master node
$ sudo cat /var/lib/rancher/k3s/server/node-token
# Run once on all Worker nodes
curl -sfL https://get.k3s.io | \
INSTALL_K3S_EXEC="--node-ip=<worker IPv4> --node-external-ip=<worker IPv4>" \
K3S_URL=https://<master IPv4>:6443 \
K3S_TOKEN=<node-token> \
sh -
# Get cluster nodes on Master node
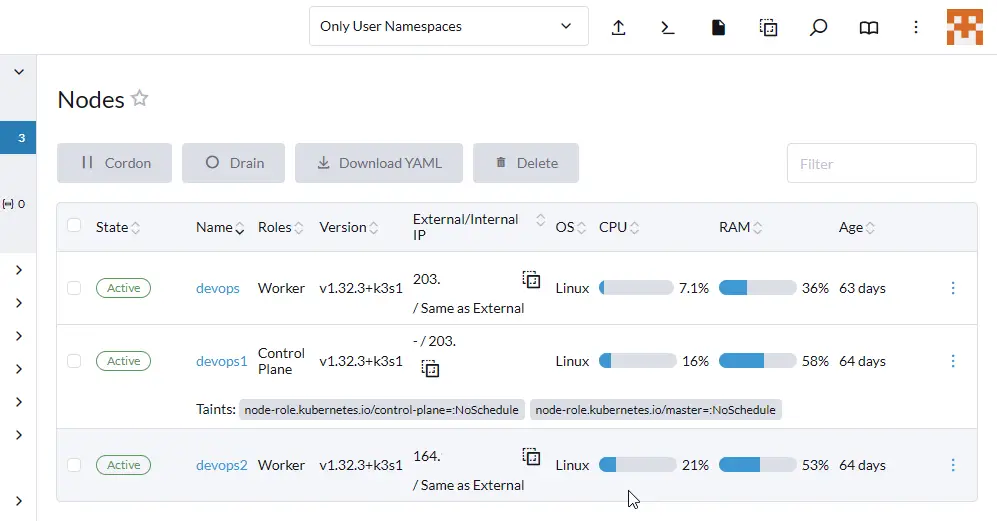
$ kubectl get nodes
NAME STATUS ROLES AGE VERSION
worker1 Ready <none> 59d v1.32.3+k3s1
master Ready control-plane,master 60d v1.32.3+k3s1
worker2 Ready <none> 60d v1.32.3+k3s1
$ kubectl get nodes -o wide
NAME STATUS ROLES AGE VERSION INTERNAL-IP EXTERNAL-IP OS-IMAGE KERNEL-VERSION CONTAINER-RUNTIME
devops Ready <none> 61d v1.32.3+k3s1 <worker-1 IPv4> <worker-1 IPv4> Ubuntu 22.04.5 LTS 5.15.0-138-generic containerd://2.0.4-k3s2
devops1 Ready control-plane,master 61d v1.32.3+k3s1 <master IPv4> <none> Ubuntu 22.04.5 LTS 5.15.0-138-generic containerd://2.0.4-k3s2
devops2 Ready <none> 61d v1.32.3+k3s1 <worker-2 IPv4> <worker-2 IPv4> Ubuntu 22.04.5 LTS 5.15.0-138-generic containerd://2.0.4-k3s2Step 4 – Configure TLS Certificates and Ingress Controller
By default, Rancher can use self-signed certificates (called Rancher Generated Certificates), but these are not trusted by browsers and show security warnings. Since my self-hosted applications will be public-facing, we are using Let’s Encrypt via cert-manager to automatically issue valid browser-trusted SSL/TLS certificates (green lock). All three components relate to automated HTTPS/TLS setup for public apps:
- cert-manager CRDs: Custom Resource Definitions to manage SSL certs in Kubernetes
- Ingress-nginx: Routes traffic from the internet to your K3s services
- ClusterIssuer: Tells cert-manager how to request certificates (e.g., via Let’s Encrypt DNS challenge)
Cert-manager CRDs
Installing the CRDs for the cert-manager ensures that all necessary CustomResourceDefinitions are in place before installing the cert-manager via Helm. Skipping this may cause the Helm release to fail.
# Install cert-manager CRDs <VERSION=v1.17.1>
kubectl apply -f https://github.com/cert-manager/cert-manager/releases/download/<VERSION>/cert-manager.crds.yaml

# Install cert-manager
$ helm repo add jetstack https://charts.jetstack.io
$ helm repo update
$ helm install \
  cert-manager jetstack/cert-manager \
  --namespace cert-manager \
  --create-namespace \
  --version <VERSION>

#  Verify the installation
$ kubectl get pods --namespace cert-manager
NAME                                       READY   STATUS    RESTARTS       AGE
cert-manager-cainjector-686546c9f7-xtfr6   1/1     Running   2 (7d5h ago)   62d
cert-manager-d6746cf45-pgr4j               1/1     Running   4 (7d5h ago)   62d
cert-manager-webhook-5f79cd6f4b-ptfln      1/1     Running   0              62d
Ingress-nginx
As I mainly followed the steps in this tutorial, Installing Cert-Manager and NGINX Ingress with Let’s Encrypt on Kubernetes, which will assist in installing the ingress controller service, I’ll just quickly review them.
# Helm install NGINX ingress controller
$ helm repo add ingress-nginx https://kubernetes.github.io/ingress-nginx
$ helm repo update
$ helm install ingress-nginx ingress-nginx/ingress-nginx \
--namespace ingress-nginx --create-namespace

# Check pod and service status after install
$ kubectl get pods -n ingress-nginx
NAME                                       READY   STATUS    RESTARTS   AGE
ingress-nginx-controller-b49d9c7b9-kx8v5   1/1     Running   0          60d

$ kubectl get svc -n ingress-nginx
NAME                                 TYPE           CLUSTER-IP     EXTERNAL-IP                     PORT(S)                      AGE
ingress-nginx-controller             LoadBalancer   10.43.217.4    <worker-1 IPv4>,<worker-2 IPv4>   80:30992/TCP,443:32020/TCP   60d
ingress-nginx-controller-admission   ClusterIP      10.43.209.65   <none>                          443/TCP                      60d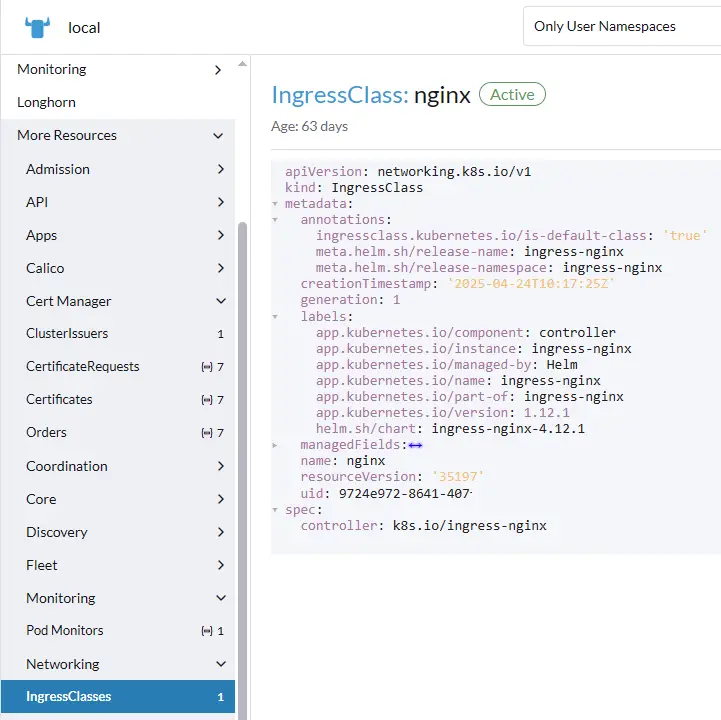
ClusterIssuer
Next, we’ll create a ClusterIssuer (clusterissuer-cloudflare.yaml) with Let’s Encrypt and configure it with Cloudflare DNS if needed.
# clusterissuer-cloudflare.yaml
apiVersion: cert-manager.io/v1
kind: ClusterIssuer
metadata:
  name: letsencrypt-dns
spec:
  acme:
    email: youremail@gmail.com
    server: https://acme-v02.api.letsencrypt.org/directory
    privateKeySecretRef:
      name: letsencrypt-dns-private-key
    solvers:
    - dns01:
        cloudflare:
          apiTokenSecretRef:
            name: cloudflare-api-token-secret
            key: api-token
Create Cloudflare API Token In your Cloudflare dashboard:
- Go to My Profile → API Tokens → Create Token
- Choose template: “Edit zone DNS”
- Limit to specific zone (your domain)
- Save the generated token
- Store API token as a Kubernetes secret
$ kubectl create secret generic cloudflare-api-token-secret \
  --from-literal=api-token='YOUR_CLOUDFLARE_API_TOKEN' \
  --namespace=cert-manager

$ kubectl apply -f clusterissuer-cloudflare.yaml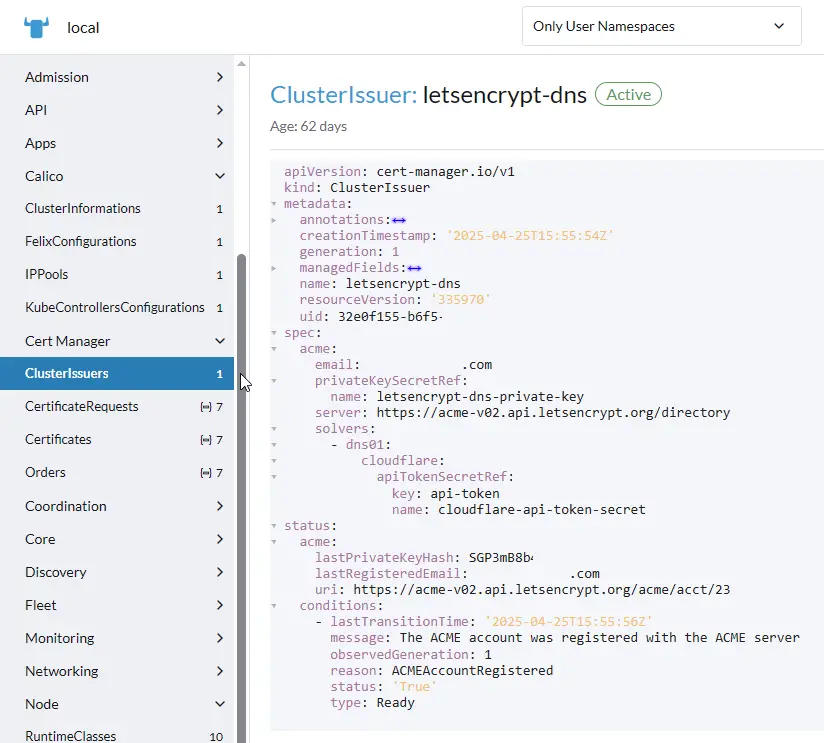
Future Self-hosted App Deployment
You can add the following code to your values.yaml file to make K3s automatically generate a certificate through its cert-manager for an app deployment using helm chart. Additional annotations can enforce more stringent nginx controls; these must be compatible with Cloudflare DNS, for example, where you would add A records first. Accessing the application from https://k3-myapp.example.com via Worker-1 and Worker-2 IPv4 in round-robin should be feasible.
| Type | Name | Content | Proxy status | TTL |
| A | k3-myapp | Worker-1 IPv4 | Proxied | Auto |
| A | k3-myapp | Worker-2 IPv4 | Proxied | Auto |
# To include in values.yaml for helm chart install
ingress:
  main: # Used for Helm chart (remove for raw Kubernetes Ingress manifest (not Helm))
    enabled: true
    ingressClassName: nginx # Recommended if not default
    annotations:
      cert-manager.io/cluster-issuer: letsencrypt-dns # Required for cert-manager
      nginx.ingress.kubernetes.io/ssl-redirect: "true" # Recommended for HTTPS
    hosts:
      - host: k3-myapp.example.com
        paths:
          - path: /
            pathType: Prefix
    tls:
      - hosts:
          - k3-myapp.example.com
        secretName: k3-myapp-tls # Required for HTTPS
Step 5 – StorageClass (Recommended)
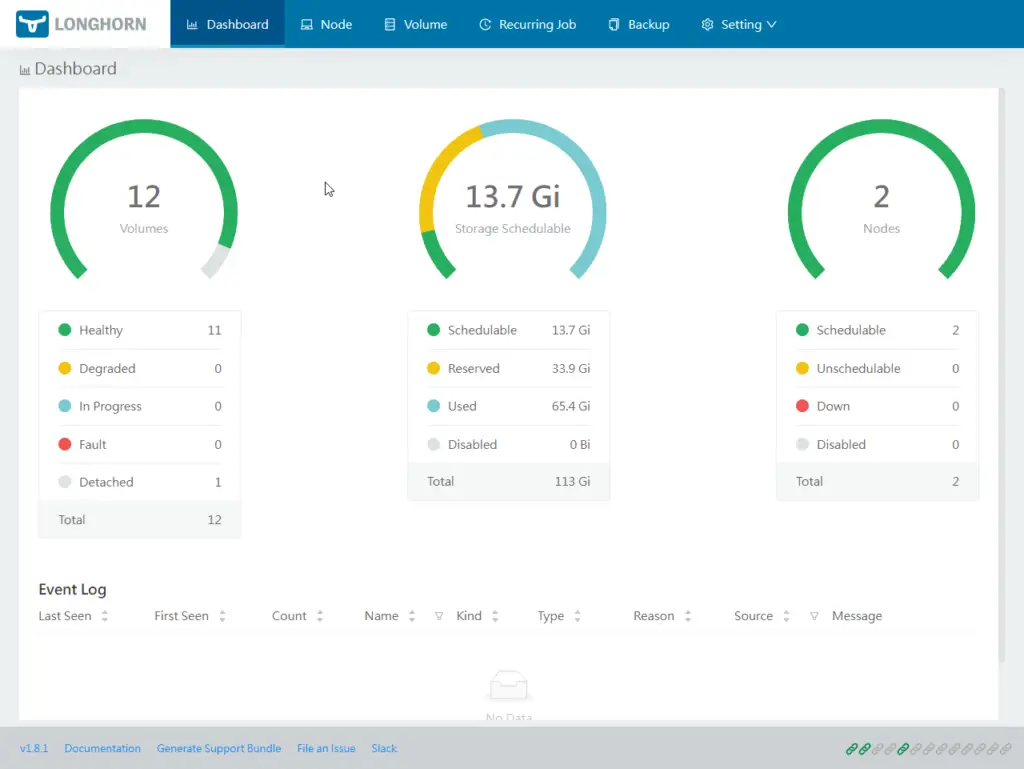
I require some form of data backup, as I possess two worker nodes, each of which has 70 GB of disk space. Most cron backups use tar and rsync to send files to a remote storage, like a VPS or S3 object storage, but it can be difficult to archive that for a cluster. Longhorn is a distributed block storage system for Kubernetes that is lightweight, dependable, and simple to use. Following deployment, users can take advantage of Longhorn’s persistent volumes. Reasons for selecting the longhorn storage class included:
- The high availability (HA) feature of Longhorn replicates volumes among worker nodes. So, if one of my worker nodes fails, the data on the other one will still be there.
- One more reason is that it’s easy to set up: from the Rancher dashboard, go to Apps > Charts > Longhorn
- It is also future-proof, as it supports snapshots and backups to remote targets such as S3. This is helpful because I could use my existing iDrive e2 subscription or install S3-compatible software on another storage VPS.
- In addition to features like creating recurring jobs and one-click backup, the Longhorn UI dashboard for managing the storage system provides a summary of storage usage by various apps and nodes.
Step 6 – Install Rancher Dashboard
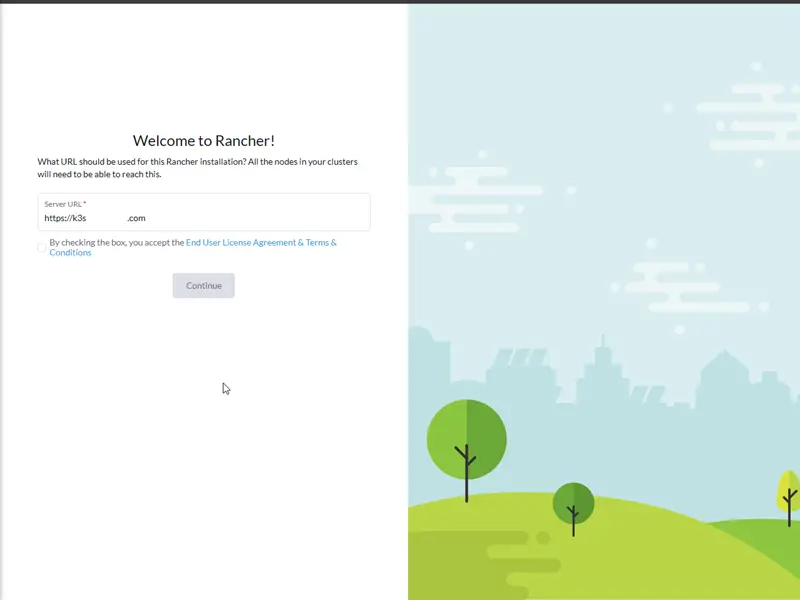
When Rancher is installed on top of K3s, it provides a full-featured web interface to manage the cluster, including workloads, nodes, namespaces, and user access. In contrast, K3s alone offers a lightweight Kubernetes distribution with CLI-only access via kubectl, and does not include a built-in web dashboard. Rancher makes it simple to delete a pod, examine the services in a namespace, and even install Grafana and Prometheus for built-in monitoring from the app catalog (helm charts). This guide can help you set up Rancher with Helm.
# Latest
$ helm repo add rancher-latest https://releases.rancher.com/server-charts/latest

# Alpha (for me at that time because it resolves a CPU bug for me )
$ helm repo add rancher-alpha https://releases.rancher.com/server-charts/alpha

# Create Rancher namespace
$ kubectl create namespace cattle-system

# Final helm install Rancher Dashboard
$ helm install rancher rancher-stable/rancher \
  --namespace cattle-system \
  --set hostname=k3s.example.com \
  --set bootstrapPassword=<password> \
  --set ingress.tls.source=letsEncrypt \
  --set letsEncrypt.email=youremail@gmail.com \
  --set letsEncrypt.ingress.class=nginx

# or rancher-alpha
$ helm install rancher rancher-alpha/rancher \
  --namespace cattle-system \
  --set hostname=k3s.example.com \
  --set bootstrapPassword=<password> \
  --set ingress.tls.source=letsEncrypt \
  --set letsEncrypt.email=youremail@gmail.com \
  --set letsEncrypt.ingress.class=nginx

# Verify Rancher deployed successfully
$ kubectl -n cattle-system get deploy rancher
NAME      READY   UP-TO-DATE   AVAILABLE   AGE
rancher   3/3     3            3           59d
Cloudflare records
If I recalled correctly, when install the rancher dashboard, I reverted DNS only and update to Proxied once all the installation and Let’s Encrypt SSL is deployed successfully for the dashboard URL.
| Type | Name | Content | Proxy status | TTL |
| A | k3s | Worker-1 IPv4 | Proxied | Auto |
| A | k3s | Worker-2 IPv4 | Proxied | Auto |
Conclusion
It required more than a week to complete the configuration of my K3s cluster because I was constantly altering my HA architecture, master/worker combinations, CNI selection, load balancer, and the number of failed trial and error attempts that were prompted by outdated installation guides. I have installed a few self-hosted applications from Awesome-Selfhosted, and my K3s has been operational for the past 60 days. It’s important to note that most apps still only support Docker and not Helm Chart right out of the box. Therefore, the process of searching for unofficial Helm distributions, which are generally not actively maintained, can be time-consuming.
Other Thoughts
Will I suggest K3s or any other distribution of Kubernetes to other enthusiasts? I have mixed feelings because it’s not yet a popular method of deploying self-hosted apps, and some developers aren’t even interested in adding to their main branch, even after others have given their app a helm chart version. I paid for three servers to set up the K3s cluster, even though I could have used two servers—one for backup storage and one for Docker—which would have allowed me to deploy, test, and delete different apps fast using Docker or Docker compose. But, if you’re like me and work in the IT sector, and you deal with OpenShift daily, you’ll feel good about yourself being able to run your own small cluster. Is there anything I would have done differently? Certainly, purchase three nodes with identical specifications to implement a three-master high availability embedded etcd. Maintain the default flannel CNI without replacing it with another, as I end up not utilizing network policy.