Introduction
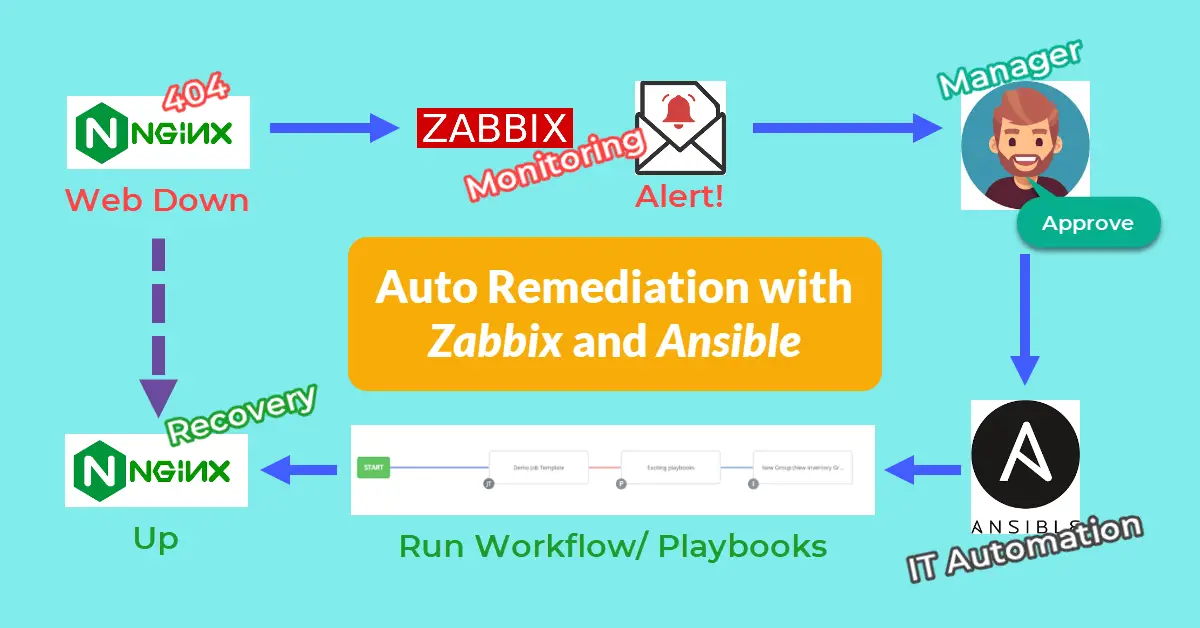
Automated remediation aims to reduce the recovery time objective (RTO), which is the maximum acceptable time that an application, network, or system can be down after an unexpected failure takes place. Ansible is one of the most popular DevOps configuration management tools in the market. AWX is a web UI with user access control to manage the Ansible playbooks, inventories, and credentials. Both Zabbix and AWX are open-source projects and will be used to demonstrate auto-remediation where a workflow has been approved via marker-checker to restart Nginx service generated by Zabbbix email alert.
Prerequisites
It is recommended to have 3 services on minimum 2 servers. For example, Zabbix and Ansible AWX on one server and Nginx on the remote host can be monitored.
- Zabbix Monitoring – monitors the Nginx web-server and interacts with Ansible AWX server via tower-cli.
- Ansible AWX – stores the Nginx web-server SSH credentials, so the playbook can restart the service.
- Nginx web server – displays the default webpage when the public IP address is entered into a browser.
Step 1 – Install Zabbix, Ansible, Nginx
Zabbix Monitoring
Go to the Zabbix download and installation page and pick the appropriate information for your server. A typical configuration would consist of:
- ZABBIX VERSION = 6.0 LTS
- OS DISTRIBUTION and VERSION = Find your server OS using
$ cat /etc/os-release - ZABBIX COMPONENT = Server, Frontend, Agent
- DATABASE = Whatever DB you are familiar with.
- WEB SERVER = Your preferred web server to run Zabbix.
Then, follow and complete the installation steps at 2. Install and configure Zabbix for your platform, which will reflect your pre-selected options.
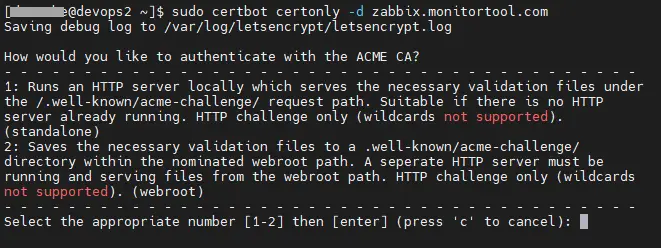
$ sudo certbot certonly -d zabbix.monitortool.com Let’s Encrypt users can choose to secure the frontend by selecting option 2: Saves the necessary validation files to a .well-known/acme-challenge/ directory. This is because option 1 could cause error Could not bind TCP port 80 because it is already in use by another process on this system (such as a web server) if there are other existing web applications running on the server.
The default URL for the Zabbix website is http://<server IP>/zabbix. However, you can change it to https://monitortool.com or https://zabbix.monitortool.com by adding the Apache VirtualHost settings to /etc/httpd/conf.d/zabbix.conf. The default username/password is Admin/zabbix, but please remember to change both username and password in Administration > Users on the first login.
<VirtualHost *:443>
    DocumentRoot /usr/share/zabbix
    ServerName zabbix.monitortool.com

    # Other directives here
    ErrorLog /var/log/httpd/zabbix.monitortool.com-error.log
    CustomLog /var/log/httpd/zabbix.monitortool.com-access.log combined

    SSLCertificateFile /etc/letsencrypt/live/zabbix.monitortool.com/fullchain.pem
    SSLCertificateKeyFile /etc/letsencrypt/live/zabbix.monitortool.com/privkey.pem
    Include /etc/letsencrypt/options-ssl-apache.conf
</VirtualHost>
Ansible (AWX) IT Automation
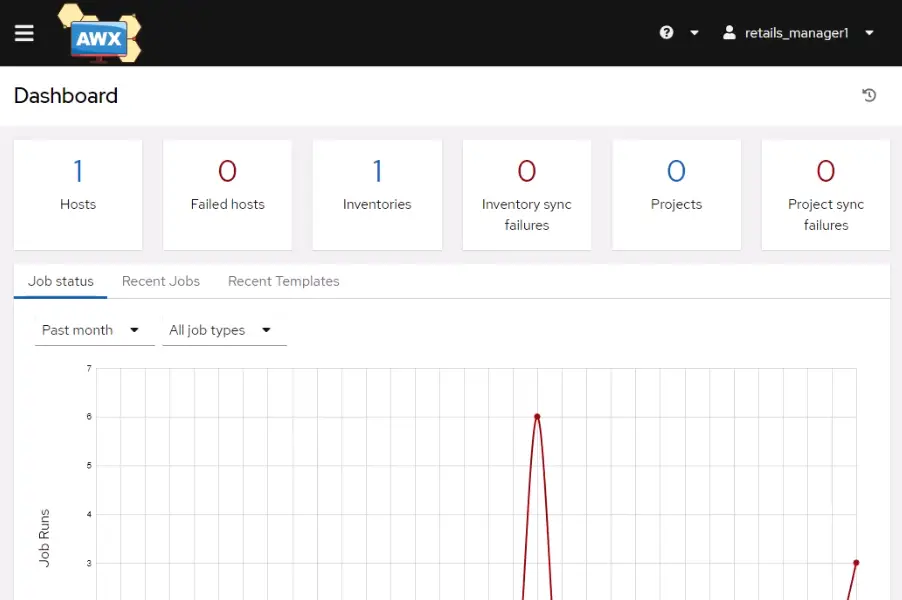
There are two ways to install Ansible AWX: using the AWX Operator starting with version 18.0 or using Docker for earlier versions. From version 18, it appears that the AWX Operator built favors the Kubernetes environment only. However, in the Installing AWX document, there are still options for OpenShift, Kubernetes, and Docker-Compose in version 17.x. NOTE: If you’re installing an older release of AWX (before 18.0), these instructions have changed.
In this tutorial, we will use Docker-Compose to deploy Ansible AWX. I think it’s easier to set up using images from Docker Hub. In the year 2020, Memcached was replaced by Redis, consequently, the code pertaining to Memcached has been commented out of YAML. We use a tool called nginx-proxy to automatically connect to Docker containers using docker-gen.
# Based on: https://gitlab.com/wkleinhenz/ansible-awx-in-docker-compose/-/blob/ebd4e969c775778025c85e9a8f4c790b8be9e858/docker-compose.yml

version: '2'
services:

  web:
    image: ansible/awx:17.1.0
    container_name: awx_web
    depends_on:
      - redis
      - postgres
    #ports:
      #- "80:8052"
    hostname: awxweb
    user: root
    restart: unless-stopped
    volumes:
      - supervisor-socket:/var/run/supervisor
      - rsyslog-socket:/var/run/awx-rsyslog/
      - rsyslog-config:/var/lib/awx/rsyslog/
      - "~/.awx/awxcompose/SECRET_KEY:/etc/tower/SECRET_KEY"
      - "~/.awx/awxcompose/environment.sh:/etc/tower/conf.d/environment.sh"
      - "~/.awx/awxcompose/credentials.py:/etc/tower/conf.d/credentials.py"
      - "~/.awx/awxcompose/nginx.conf:/etc/nginx/nginx.conf:ro" # Required
      - "~/.awx/awxcompose/redis_socket:/var/run/redis/:rw"
    environment:
      VIRTUAL_HOST: awx.devcubeio.com
      VIRTUAL_PORT: 8090 # This 1 line will work without expose: or ports:
      LETSENCRYPT_HOST: awx.devcubeio.com
      LETSENCRYPT_EMAIL: getgsm@gmail.com

  task:
    image: ansible/awx:17.1.0
    container_name: awx_task
    depends_on:
      - redis
      - web
      - postgres
    command: /usr/bin/launch_awx_task.sh
    hostname: awx
    user: root
    restart: unless-stopped
    volumes:
      - supervisor-socket:/var/run/supervisor # Required else awx_task | ERROR awx.main.utils.reload supervisorctl restart awx-rsyslogd errored with exit code `7`, stdout:
      - rsyslog-socket:/var/run/awx-rsyslog/
      - rsyslog-config:/var/lib/awx/rsyslog/
      - "~/.awx/awxcompose/SECRET_KEY:/etc/tower/SECRET_KEY"
      - "~/.awx/awxcompose/environment.sh:/etc/tower/conf.d/environment.sh"
      - "~/.awx/awxcompose/credentials.py:/etc/tower/conf.d/credentials.py"
      - "~/.awx/awxcompose/redis_socket:/var/run/redis/:rw"
    environment:
      http_proxy:
      https_proxy:
      no_proxy:
      #SUPERVISOR_WEB_CONFIG_PATH: '/supervisor.conf'
      # $ docker exec -it awx_task bash
      # $ whereis supervisord.conf
      # supervisord: /etc/supervisord.conf /usr/local/bin/supervisord
      SUPERVISOR_WEB_CONFIG_PATH: '/etc/supervisord.conf' # Adopt from https://github.com/confluentinc/demo-scene/blob/master/ansible-tower/awx/docker-compose.yml

  redis:
    image: redis
    container_name: awx_redis
    restart: unless-stopped
    environment:
      http_proxy:
      https_proxy:
      no_proxy:
    command: ["/usr/local/etc/redis/redis.conf"] # without this, the "Jobs" in AWX will not run!!
    volumes:
      - "~/.awx/awxcompose/redis.conf:/usr/local/etc/redis/redis.conf:ro"
      - "~/.awx/awxcompose/redis_socket:/var/run/redis/:rw"

  postgres:
    image: postgres:12
    container_name: awx_postgres
    restart: unless-stopped
    volumes:
      - ~/.awx/pgdocker/12/data/:/var/lib/postgresql/data/pgdata:Z
    environment:
      POSTGRES_USER: awx
      POSTGRES_PASSWORD: awxpass
      POSTGRES_DB: awx
      PGDATA: /var/lib/postgresql/data/pgdata
      http_proxy:
      https_proxy:
      no_proxy:

volumes:
  supervisor-socket:
  rsyslog-socket:
  rsyslog-config:

# https://www.rent-a-hero.de/2017/06/09/use-j-wilders-nginx-proxy-for-multiple-docker-compose-projects/
# https://docs.docker.com/compose/networking/#use-a-pre-existing-network
networks:
  default:
    external:
      name: nginx-proxy
To onboard the Nginx server host, go to Resources > Credentials > Add > Credential Type=Machine and enter the SSH private key to connect. Ansible will then be able to run playbooks on the remote server via port 22.
Nginx Web
Debian/ Ubuntu: Run $ ufw allow 'Nginx Full' to allow both http and HTTPS connections if the firewall is active. Nginx Full supports both HTTP and HTTPS protocols.
$ sudo apt update
$ sudo apt install nginx

$ sudo ufw status
Status: active

$ sudo ufw allow 'Nginx Full'CentOS: Add a --permanent flag to indicate that the changes should be applied to the permanent configuration, since the runtime and permanent configurations are separated.
$ sudo dnf install nginx

$ sudo firewall-cmd --permanent --add-service=http
$ sudo firewall-cmd --permanent --add-service=https
$ sudo firewall-cmd --reload
Step 2 – Set Up Zabbix Agent and Monitor for Nginx
Similar to the installation of Zabbix server in Step 1, we now select ‘Agent’ or ‘Agent 2’ as the ZABBIX COMPONENT to install and configure accordingly. Remember to open port 10050/TCP on monitored hosts (Zabbix agentd). For active checks, open port 10051/TCP on the Zabbix server, but we only need passive checks for now.
- (required) Passive checks: Server=<IP of Zabbix server>
- (optional) Active checks: ServerActive=<IP of Zabbix server>:10051
$ sudo firewall-cmd --zone=public --add-port=10050/tcp --permanent
$ sudo firewall-cmd --reload
$ sudo vi /etc/zabbix/zabbix_agent2.conf
#Server=127.0.0.1
Server=<Zabbix server IP>
# Rem to comment out ServerActive=127.0.0.1 else
# /var/log/zabbix/zabbix_agent2.log : [101] cannot connect to [127.0.0.1:10051]: dial tcp :0->127.0.0.1:10051: connect: connection refused
#ServerActive=127.0.0.1
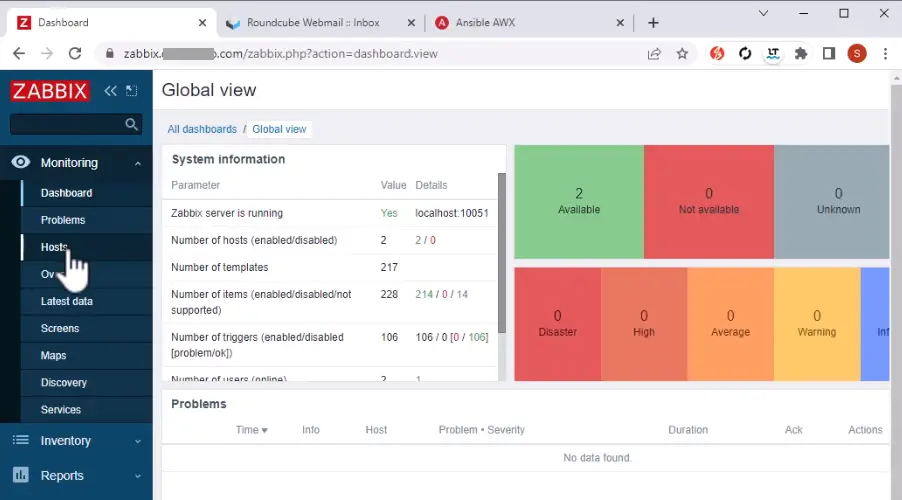
$ sudo systemctl restart zabbix-agent2After successfully configuring the Zabbix agent on the Nginx server, proceed to log in to Zabbix and create a host using the following inputs. If no data is being transmitted from Nginx to the Zabbix server after a duration of 5 minutes, it is recommended to investigate the agent log located at /var/log/zabbix/zabbix_agent2.log.
- Host name: My Nginx server
- Template: Nginx by Zabbix agent
- Groups: Linux servers
- Interfaces > Add Agent: IP address=<Nginx server IP> | DNS name=<empty> | Connect to=IP | Port=10050
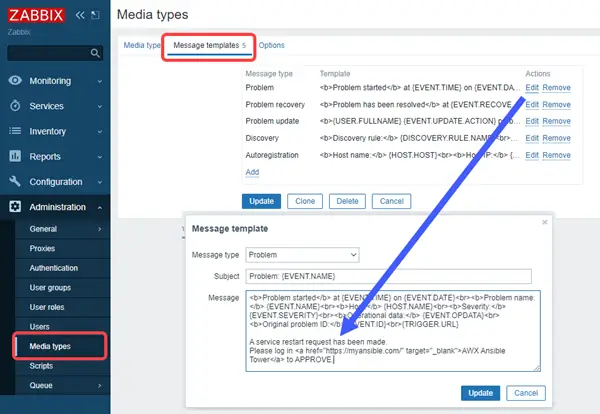
The notification message template should include the Ansible URL, so that whoever receives the email can click on the link to go to the login page to approve the workflow.
Step 3 – Add 2 Playbooks, 1 Workflow in Ansible
AWX 17.x should be based on Ansible v2.8 (https://docs.ansible.com/ansible/2.8/user_guide/playbooks_intro.html#tasks-list). Below is a sample Playbook 1 that can be utilized to restart Nginx regardless of its current state.
---
- name: Restart services
  hosts: 63.xxx.xxx.xxx
  become: true
  tasks:
    - name: Restart nginx
      service: name=nginx state=restarted
The Playbook 2 will export Nginx error and access logs for root cause analysis before the Playbook 1 restarts the service. Use $ docker exec -it awx_task bash to access the exported logs.
---
- hosts: 63.xxx.xxx.xxx
gather_facts: no
tasks:
- name: Ansible copy file from remote to local
fetch:
src: /var/log/nginx/error.log
dest: /tmp/nginx_logs/
flat: yes
- name: Ansible copy file from remote to local
fetch:
src: /var/log/nginx/access.log
dest: /tmp/nginx_logs/
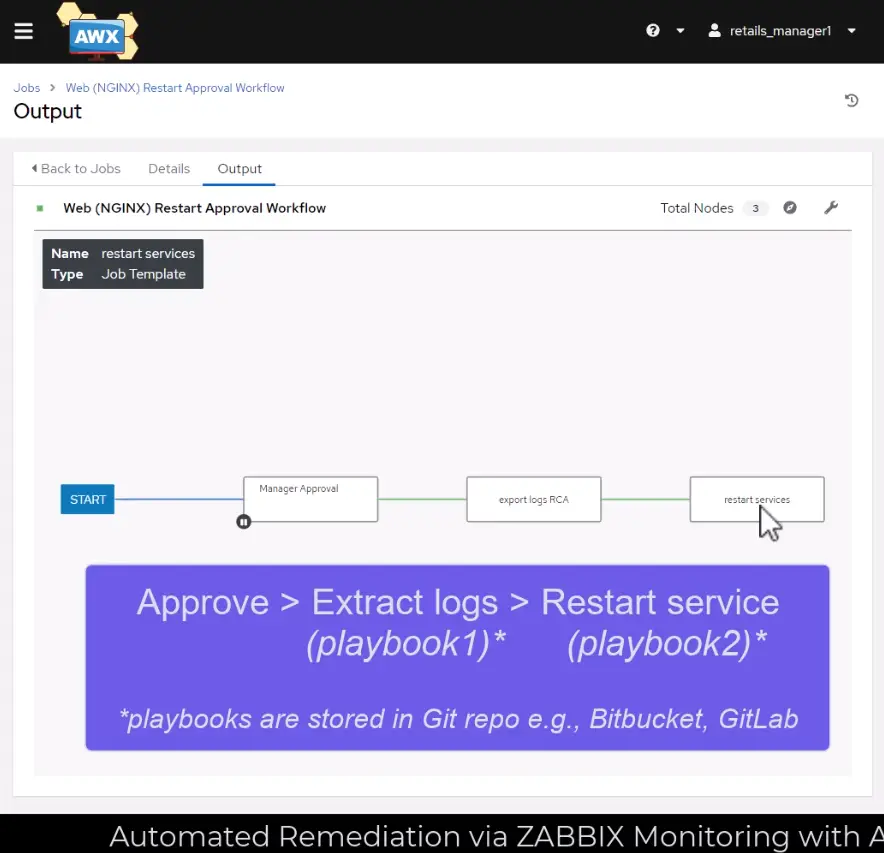
flat: yesGo to Resources > Templates > Add workflow template to create a workflow. To begin building the below nodes, find the newly created workflow and click on its Visualizer. Node type should be either Approval or Job Template.
Step 4 – Run Service Recovery Simulation
Bring Down Nginx
Just like a magician, you can show to the audience that the Nginx web page is up and running. Then, SSH into the web server $ pkill nginx and refresh the browser to show the service is down. This will promptly trigger the Zabbix monitor alert, resulting in the dispatch of a notification email to the manager.
Zabbix Email Alert
You can 1-click approve the workflow using tower-cli, but we will probably need a middleware or some server that hosts a Python script that sends an access token to request headers and makes an HTTP GET or POST request using the tower API. Clicking on the email link will redirect the approver to the Ansible login page.

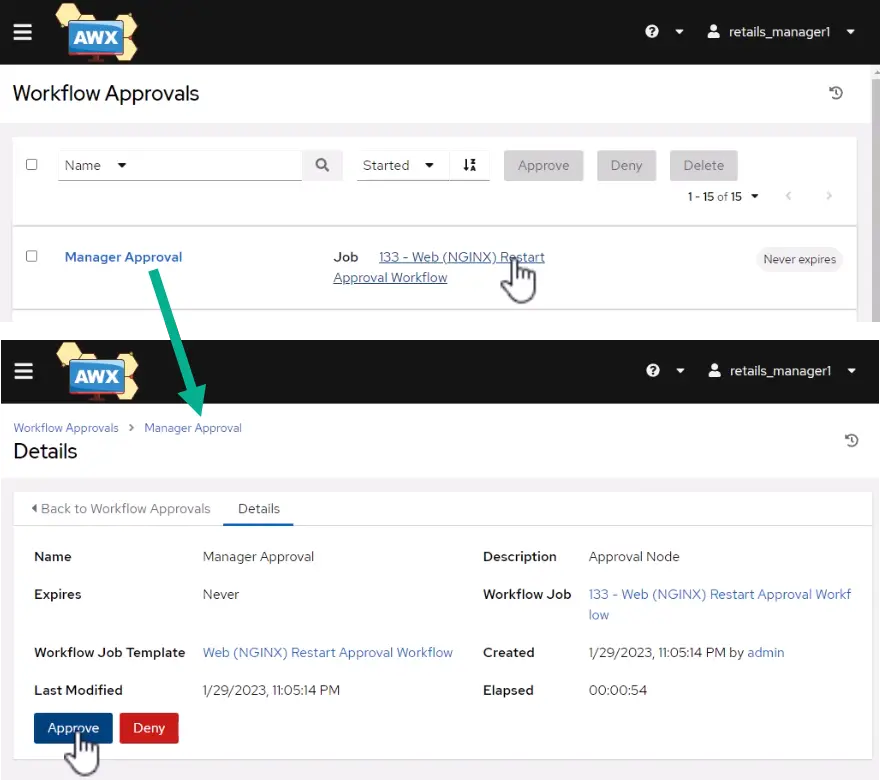
Maker-Checker Process in Ansible
The manager will need to check if the service is down and then check the job description before agreeing to run the workflow. This process, commonly referred to as the maker-checker process, constitutes one of the fundamental principles of authorization in the information systems of financial institutions.
Playbook to Restart Nginx Service
The workflow will run the export-logs playbook to get error and access logs and put them in the /tmp folder in the awx_task docker container. Execute $ docker exec -it awx_task bash to access these log files. The restart-services playbook will be used to restart the Nginx service. It will only take a couple of minutes for Zabbix to discover and disable the alert. Enter the Nginx server IP address in the browser to confirm that the web page can load with HTTP 200 OK status.
Conclusion
This remediation demo is not fully automated because a manager still had to approve the workflow to restart the failed service. The tower OAuth token authentication cannot be embedded in email triggered by Zabbix to offer a one-click approval or deny button. However, the employee should investigate for a true positive and seek the manager’s approval to recover the service. Organizations need a maker-checker workflow where no one can bring up/down an app service alone. Automated remediation eliminates human errors by undertaking repetitive tasks, thereby decreasing the requirement for manual intervention, with the objective of reducing Recovery Time Objective (RTO).