Introduction
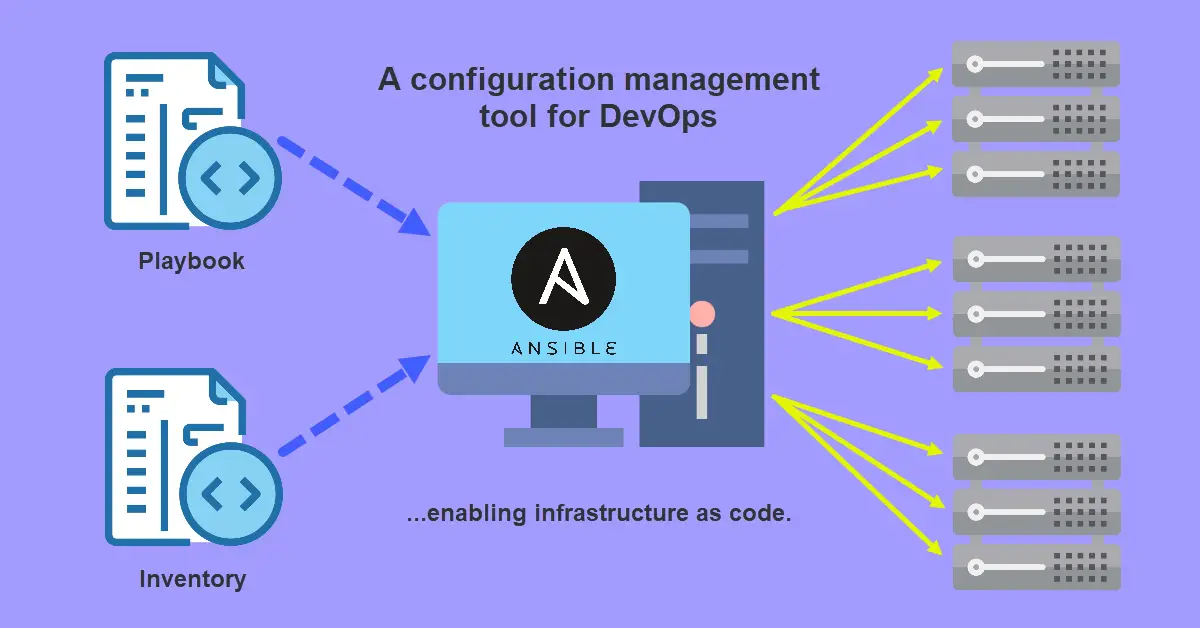
Ansible is one of the few configuration management tools in the DevOps environment. It is an infrastructure automation platform used to deploy our applications and systems rapidly to enable continuous integration and continuous deployment. While there are others like Chef and Puppet, Ansible is the most popular of the lot. Some advantages include easy to understand language (YAML and Python), ease of setup without the need to install any agents on client machines and ease of access since playbook tasks are run over SSH connections and Unix-like machines will have SSH running by default.
Prerequisites
- A primary server installed with Ansible which is also known as the control node.
- A secondary server (one of the managed nodes) to accept incoming tasks from the control node.
- Familiar with YAML syntax to code inventory.yml and playbook.yml
- Basic understanding of Linux commands like adduser, yum and apt etc.
Concepts
The basic concepts of Ansible are broken down into these six items:
- Control node – Any server with Ansible installed.
- Managed nodes – Downstream servers (hosts) managed by control node.
- Inventory – A file (INI or YAML format) containing a list of managed nodes.
- Modules – Each module has a predefined set of call-to-action functions to be use in tasks.
- Tasks – A series of actions where sometimes dependent on conditions written in a playbook.
- Playbooks – Contains an ordered list of tasks to execute on hosts.
The two main concepts that made up Ansible are Inventory and Playbooks whereas both Tasks and Modules are “building blocks” of playbooks.
Step 1 – Building an Inventory
After we had installed Ansible, the sample inventory file is /etc/ansible/hosts and this uses the INI format. We can always create multiple inventory files at different locations and specify the inventory host path using the -i option at command line.
$ ansible-playbook playbook.yml -i /home/devops/inventory.yml -u user -K# Inventory (INI) /etc/ansible/inventory
[webservers]
192.168.1.100
[webservers:vars]
web_service=nginx
[dbservers]
192.168.1.110:2222My personal preference will be YAML format because another DevOps tool, Docker Compose, is also coded with YAML language. Furthermore, Google Trends for keyword “ansible yml” and “ansible yaml” got double interest over time vs “ansible ini”.
# Inventory (YAML) /etc/ansible/inventory.yml
all:
  hosts:
  children:
    webservers:
      hosts:
        192.168.1.100
    dbservers:
      hosts:
        192.168.1.110:2222
Do not attempt to change hosts: to parent: or children: to downstream: etc. because we will get this error [WARNING]: Skipping unexpected key (downstream) in group (all), only “vars”, “children” and “hosts” are valid…
Step 2 – Working with Playbooks
Using Variables
Most hosts are set up differently from one another. For example, they might run different services, then we will assign the respective packages to be installed to a variable called db_packages, db_packages2… and include them with name: “{{ db_packages }}”. Other times, we want to create multiple accounts for a list of users, then we will add all the usernames to a list variable. The use of variables allows our playbooks for more customization due to less hard-coding and we can assign values to variables in an inventory, playbook or external YAML file as shown in the examples below.
# Inventory (INI) /etc/ansible/inventory
[webservers:vars]
web_service=nginx

# Playbook /etc/ansible/playbook.yml
tasks:
  - name: "Install {{ web_service }}"
    yum: "pkg={{ web_service }} state=present"
# Playbook /etc/ansible/playbook.yml
- hosts: dbservers
tasks:
- name: install MySQL and PostgreSQL
yum:
name: "{{ db_packages }}"
state: present
become: yes
vars:
db_packages: mysql-server,postgresql-serverAs mentioned in Ansible Docs, we may wish to make our playbook source public while keeping certain important variables private.
# Playbook /etc/ansible/playbook.yml
tasks:
  - name: "Check {{ web_service }} already installed"
    yum: "list={{ web_service }}"
    register: webserver_installed

# External variables (YAML) /etc/ansible/secret.yml
web_service: nginx
Conditionals: The When Statement
Can we execute this task on this host? Are the packages already installed? Should we run yum or apt on this Linux distribution? The answers to these questions of course depend on certain conditions. In Ansible, we use the when: to check for conditions before a particular task can execute or be skipped. In the two examples below, we used selectattr to check if a package is already installed and ansible_facts[‘distribution’] to check if the installed Linux distro is CentOS.
# Playbook /etc/ansible/playbook.yml
tasks:
  - name: "Install {{ web_service }}"
    yum: "pkg={{ web_service }} state=present"
    when: webserver_installed.results | selectattr("yumstate", "match", "installed") | list | length == 0
    notify:
      - restart webserver
  - name: install MySQL and PostgreSQL
    yum: "pkg={{ web_service }} state=present"
    when: ansible_facts['distribution'] == 'CentOS'
    become: yes
Loops: Standard loops
We can assign different values to a variable for each task repetition. We can declare a list in playbook or use an external YAML file as mentioned in section Using Variables. In these two examples, we loop a task with three different usernames (declared within the Playbook) to add and assign each of them to the “wheel” group. Next, we delete two of the three user accounts with a list from an external YAML file. In CentOS, members of the wheel group are automatically grant sudo privileges.
# Playbook /etc/ansible/playbook.yml
tasks:
  - name: Add 3 users and assign to group
    user:
      name: "{{ item }}"
      state: present
      groups: "wheel"
    loop:
      - testuser1
      - testuser2
      - testuser3
  - name: Delete 2 users
    user:
      name: "{{ item }}"
      state: absent
      remove: yes
      groups: "wheel"
    loop: "{{ remove_users_list }}"

# External variables (YAML) /etc/ansible/secret.yml
remove_users_list:
  - testuser2
  - testuser3
Some modules like yum don’t require the use of loop to install multiple packages as we can just list all packages separated by commas.
# Playbook /etc/ansible/playbook.yml
tasks:
  - name: Install MySQL and PostgreSQL
    yum:
      name: "{{ db_packages }}"
      state: present

# Inventory (INI) /etc/ansible/inventory
[dbservers:vars]
db_packages=mysql-server,postgresql-server
Blocks
We can group a series of tasks into a block in the playbook. As mentioned in Ansible doc, we can group most of the tasks (with the exception of loops) at block level. For example, we can group all tasks running the yum module into a block and only to execute this block of tasks when the distribution is CentOS. Likewise, we can create another block of tasks using apt module for Debian/ Ubuntu distros. In the end, either one block will execute and the other be skipped if your Linux is one of Ubuntu, CentOS or Debian.
# Playbook /etc/ansible/playbook.yml
tasks:
  - name: Install databases and Docker
    block:
    - name: install MySQL and PostgreSQL
        yum:
        name: "{{ db_packages }}"
        state: present
    - name: install Docker Engine
        yum:
        name: "{{ docker_engine }}"
        state: present
    when: ansible_facts['distribution'] == 'CentOS'
    become: yes
Step 3 – Piecing it all together
# Playbook /etc/ansible/playbook.yml
- hosts: webservers
  gather_facts: yes
  become: yes
  tasks:
    - name: "Check {{ web_service }} already installed"
      yum: "list={{ web_service }}"
      register: webserver_installed
      #failed_when: no
    - name: "Install {{ web_service }} if not installed"
      yum: "pkg={{ web_service }} state=present"
      when: webserver_installed.results | selectattr("yumstate", "match", "installed") | list | length == 0
      notify:
        - restart webserver
    - name: "Enable {{ web_service }} during boot"
      service: "name={{ web_service }} state=started enabled=yes"
    - name: Add 3 users and assign to group
      user:
        name: "{{ item }}"
        state: present
        groups: "wheel"
      loop:
        - testuser1
        - testuser2
        - testuser3
    - name: Delete 2 users
      user:
        name: "{{ item }}"
        state: absent
        remove: yes
        groups: "wheel"
      loop: "{{ remove_users_list }}"
  handlers:
    - name: restart webserver
      service: "name={{ web_service }} state=restarted"
  vars_files:
    - secret/external_vars.yml

- hosts: dbservers
  tasks:
    - name: Install databases and Docker
      block:
        - name: install MySQL and PostgreSQL
          yum:
            name: "{{ db_packages }}"
            state: present
        - name: install Docker Engine
          yum:
            name: "{{ docker_engine }}"
            state: present
      when: ansible_facts['distribution'] == 'CentOS'
      become: yes
  vars:
    db_packages: mysql-server,postgresql-server
    docker_engine: docker-ce-3:18.09.0-3.el7,docker-ce-cli-1:18.09.0-3.el7,containerd.io
# Inventory (YAML) /etc/ansible/inventory.yml
all:
hosts:
children:
webservers:
hosts:
192.168.1.100
dbservers:
hosts:
192.168.1.110:2222# External variables (YAML) /etc/ansible/secret.yml
web_service: nginx
remove_users_list:
- testuser2
- testuser3Above three files form the basis of a working infrastructure as code automation using Ansible. The main file is the playbook which demonstrates different ways to execute various tasks. To run the playbook, we use ansible-playbook and remember to change the “user” to your username that has sudo privileges. -K is to prompt for sudo password or else we will get fatal: [107.x.x.x]: FAILED! => {“msg”: “Missing sudo password”}
$ ansible-playbook playbook.yml -i inventory.yml -u user -KThis is what happen when we run the playbook.
- Using yum module, check if web service (nginx) is already installed.
- Using yum module, install web service (nginx) if the result from (1) returns not installed.
- Using notify and handlers, restart web service (nginx) if install web service (nginx) does take place.
- Using yum module, enable web service (nginx) during boot.
- Loop through to add three users (testuser1, testuser2 and testuser3) and assign them to “wheel” group.
- Loop through to remove two users (testuser2 and testuser3).
- Using when, check if distro is “CentOS”. If true, then execute the block which contains two tasks: (a) Install MySQL and PostgreSQL (b) Docker engine
In the above tasks, we tried to install packages with yum and add new users cum assign them to a group. Within each tasks, we had also shown how to use “{{ variables }}“, check conditions using when, repeat tasks with loop and finally group a set of tasks as a block. We had also learnt to manage services – enable during boot and perform restart and initiate privilege escalations using become in order to execute tasks with root. The other two files, inventory and external variables are inputs and work hand-in-hand with the playbook.
Conclusion
As part of my learning roadmap to become a self-taught DevOps engineer, I had to learn one of the “Infrastructure as Code” configuration management tool. I picked up Ansible because it was simple to understand and deployment made easy via SSH connections. While Ansible can be configured to delegate tasks locally using “localhost”, I do recommend one to subscribe to pay-as-you-go or cheap yearly VPS to simulate a real deployment. Are we done with Ansible? Well, if you enter ansible-doc -l at the control node terminal now, you will be in for a shock! There is more than 3000+ commands available at our disposal and this tutorial is just the tip of the iceberg. Therefore, my answer will be a big NO because I would want to dig deeper and explore others (e.g. AWS or Azure) related commands.