Introduction
Do you know the 3-2-1 backup strategy? I worked in the IT industry for 20 years, but not me. But I’m sure many of us possess a lot of beloved family photos, important documents like scanned certificates, employment contracts, and health reports. What’s the best way to make sure we have multiple copies of these precious files in case the computer doesn’t recognize the only damaged hard disk or USB thumb drive? This tutorial will show you how I set up my 3-2-1 backup plan at home after a recent data loss disaster.
Background
I bought a used 2-bay NAS (D-Link DNS-320L) over five years ago and set it up with two 2TB 3.5″ HDDs in a RAID-1 setup. In the past three years, I have encountered two instances of RAID-1 failure, and both times, I was able to successfully rebuild the RAID using Crucial MX500 2TB SSD 2.5″ instead. I was impressed by the reliability of RAID and decided to upgrade to an SSD, thinking it would somehow improve read speed and have a longer lifespan without moving parts like the hard drive. Recently, two weeks before writing this tutorial, disaster struck as both SSDs had either superblock lost or metadata was partially lost and incomplete. Therefore, my NAS failed to boot, and I had to pay $1,500 for a data recovery service.
3-2-1 Backup Rule
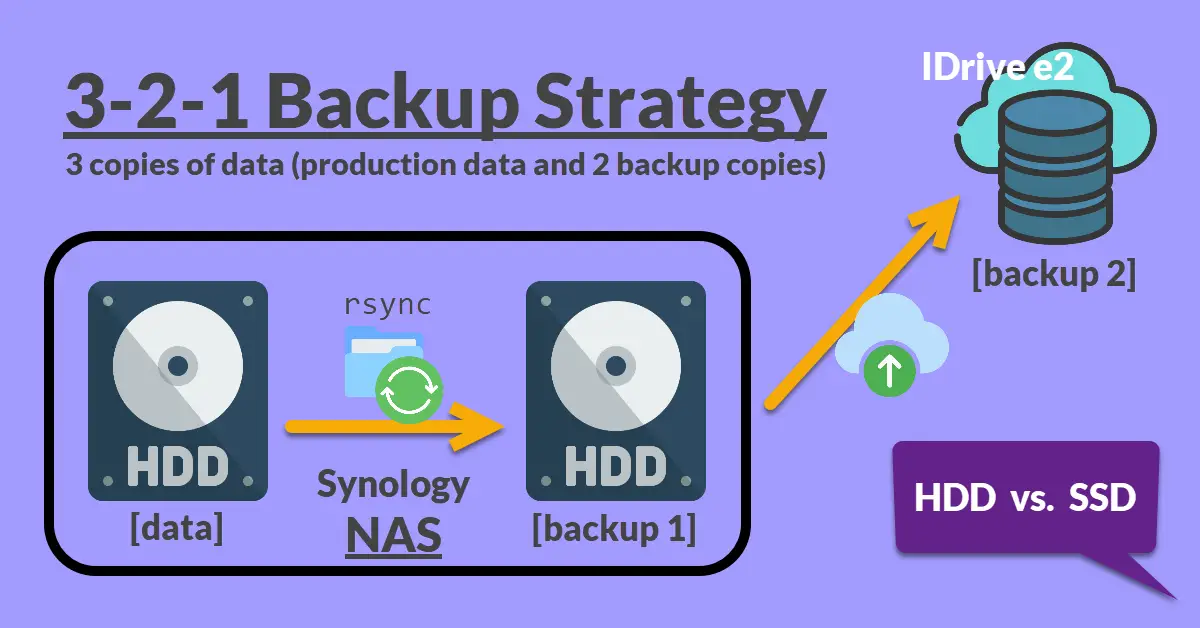
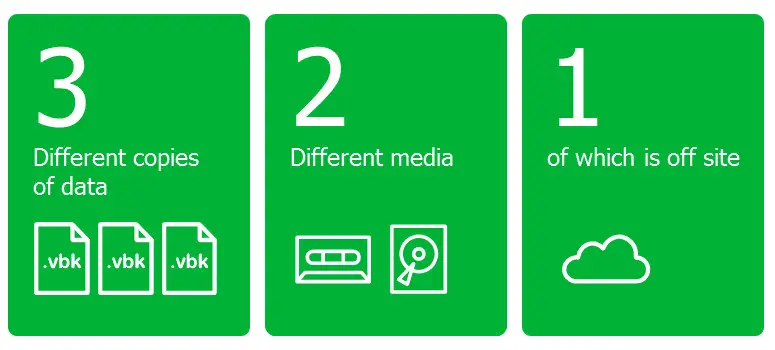
The 3-2-1 rule for data backup means keeping at least 3 copies of your data. The production and backup copy 1, which are close to you, should be on different storage media, and the backup copy 2 should be an offsite copy (for example, stored remotely using cloud services). Note: Don’t confuse RAID with Backup. RAID protects against disk failure, while Backup simply prevents data loss.
Implement 3-2-1 Backup for Home
A Network Attached Storage (NAS) is a storage device that is connected to the network and houses multiple disk drives in a designated RAID configuration. This configuration is intended to safeguard and store data for sharing with multiple computers within the network. Some people use multiple NAS devices for backup, while others make their own using open-source software (TrueNAS) and spare hard disks. Below, you’ll find out how I put in place a backup strategy that works for me and my family.
This is how I set up my new Synology 2-Bay DiskStation 223J NAS. I have chosen to install hard disk drives (HDD) over solid-state drives (SSD) and omit any RAID configurations.
| Purpose | Devices/ Services | Details | Remarks |
| Production for Sharing | 2-Bay NAS HDD-1 | 1x WD 2TB Red Plus NAS Hard Drive 3.5″ HDD | RAID type: Basic Created as Storage pool 1 > Volume 1 |
| Local Backup Copy-1 | 2-Bay NAS HDD-2 | 1x WD 2TB Red Plus NAS Hard Drive 3.5″ HDD | RAID type: Basic Created as Storage pool 2 > Volume 2 |
| Remote Backup Copy-2 | iDrive e2 Cloud Storage | Subscription: $15.00 First year, 1 TB | Sync data using Hyper Backup or IDrive app in DiskStation Manager (DSM) |
Is my setup in compliance with the 3-2-1 backup principle? No, but it is close.
| 3-2-1 Checklist | Yes / No | Remarks |
| 3 copies of data: 1 original and 2 backup copies | Yes | 1. Production (NAS HDD-1) 2. Local backup (NAS HDD-2) 3. Remote backup (Cloud) |
| Stored using 2 different media | No (but read remark) | The data is stored on two identical WD 2TB Red Plus HDDs, but not in RAID 1, as the volume data is rsync across using a Linux bash script scheduled to run twice a week. Only HDD-1 is mapped as a network drive for daily access, so ‘production’ HDD-1 should wear off faster than ‘backup’ HDD-2. |
| Off-site copy | Yes | Sync important folders twice a week with a 1TB cloud storage subscription. I opted to sync family photos and personal documents, rather than backing up my movies, anime, and downloaded PC games to cloud storage. |
Setup Synology NAS for Production, Backup 1
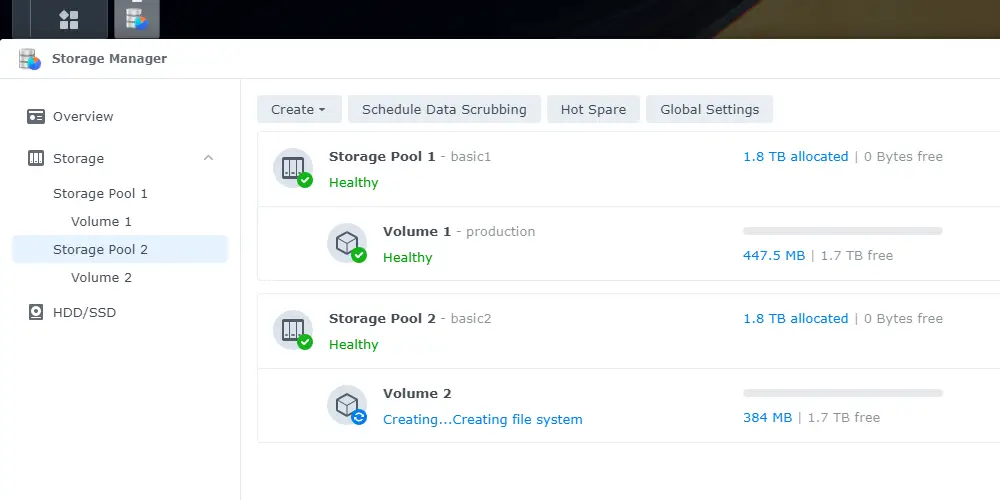
Step 1 – Create Separate Storage Pool 1, 2 and Volume 1, 2
The steps are
- It is recommended to initialize new disk drives by formatting them before inserting them into the NAS. No matter which file system you choose, Synology DiskStation Manager will only allow Btrfs (recommended) or ext4.
- Go to Storage Creation Wizard > Raid type: Basic > Check Drive 1 > file system: Btrfs > Allocate 100% capacity > Assign volume name (e.g., production or backup1) > Apply
- Repeat the above steps by checking Drive 2 for Storage Pool 2 > Volume 2
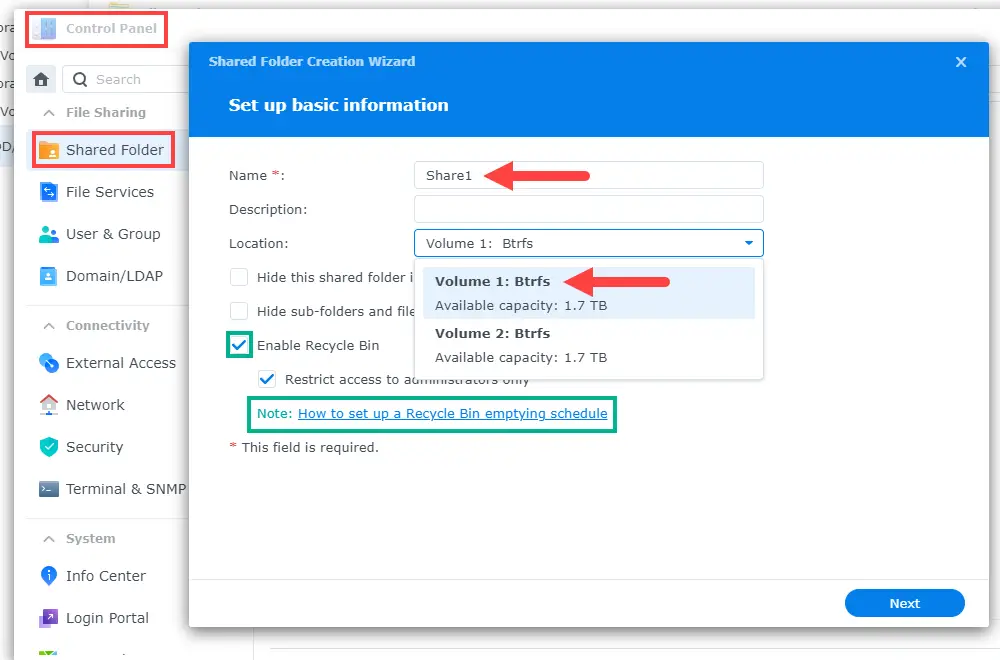
Step 2 – Shared Folder Creation
We will need to make a shared folder in Volume 1 and Volume 2. Go to Control Panel > Shared Folder > Enter Name: (e.g., Share1) > Volume 1: Btrfs > Uncheck Recycle Bin (optional) > Next …
Repeat the above steps and enter Name: (e.g., Backup1) for Volume 2. If we rsync to Volume 2 once a week, we can uncheck Recycle Bin because we would have 6 to 7 days to recover deleted data from Volume 2. It all depends on individual requirements, and you can also set up an auto-bin emptying schedule if enabled.
Step 3 – Schedule Task to Rsync Volume 1 to Volume 2
Method 1 – Hyper Backup
Create a backup task by installing Hyper Backup from the DSM package center.
- Open Hyper Backup
- Create +
- Folders and Packages
- Local Shared Folder or USB
- Single version (else Multiple versions)
- Backup Destination: (e.g., Backup1)
- Data Backup (e.g., Share1)
- Uncheck all for Application Backup
- The backup settings are based on your preferences; however, it is recommended to enable task notifications and establish a backup schedule.
- Done
Method 2 – Bash Script
Why use a Bash script when you can click through the options with Hyper Backup with ease? Hyper Backup does possess a distinct advantage over rsync, and that advantage pertains to selecting “Multiple versions” as the Backup Version Type. I’m guessing this would be useful when multiple people are working on the same file on the mapped network drive, and we can roll back to the required backup version (for example, in an office environment). Besides being a Linux enthusiast, I also have experience with bash scripting.
Note: -z, --compress: compress file data during the transfer. Do not use this unless you are transferring files from NAS1 to NAS2 over the network because rsync would have taken 3+ days for a 2TB initial sync.
#!/bin/bash

### rsync.sh
## Options Summary
# -a, --archive: archive mode (equals -rlptgoD where -r: recuse into directories)
# -v, --verbose: increase verbosity
# -h, --human-readable: output numbers in a human-readable format
# --delete: delete files from the receiving side (backup)

#rsync -zavh --delete /volume1/Share1/ /volume2/Backup1
rsync -avh --delete /volume1/Share1/ /volume2/Backup1
Copy the above ‘rsync.sh‘ script to a folder in Volume 1 and then create a ‘rsync’ task from Control Panel > Task Scheduler. Run command: bash /volume1/(shared folder)/(main directory)/(subdirectory)/rsync.sh
IDrive e2 for Remote Cloud Backup 2
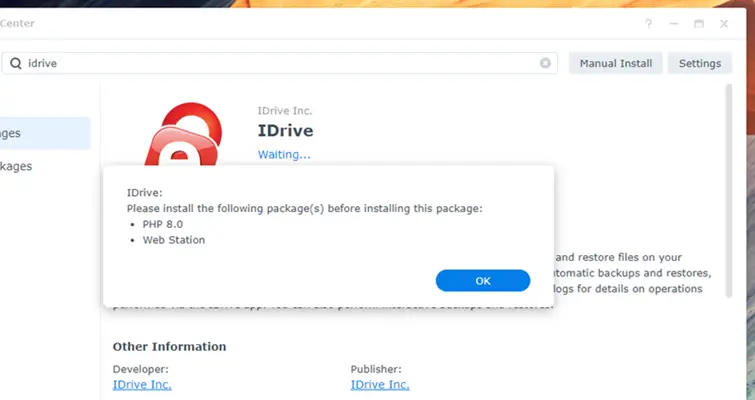
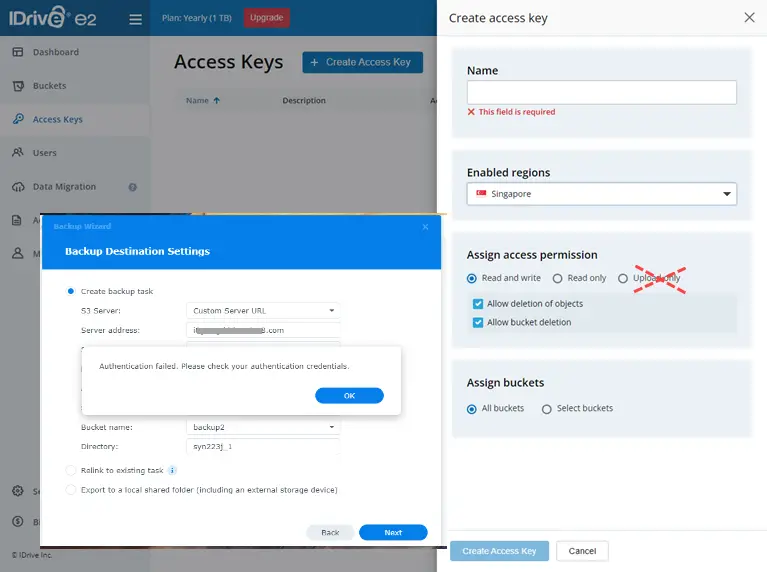
There are many online backup providers, such as IDrive (e2) and Backblaze, including Microsoft OneDrive with a free Microsoft 365 subscription. I chose IDrive because of the competitive pricing (USD$15 for 1TB storage for the first year) and the availability to create storage buckets in the Singapore region. At first, I wanted to utilize the IDrive proprietary app from DSM created by Publisher: IDrive Inc. themselves, but I needed to install PHP8 and Web Station. For me, it’s a showstopper, rather use Hyper Backup, which supports more flexible backup solutions. Note: When creating a bucket Access Key, [Assign access permission: Upload only] will cause authentication failure in Hyper Backup.
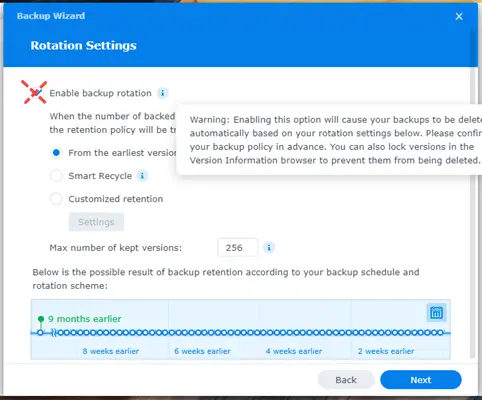
At first, I thought that [compress backup data] might save some cloud storage, but the transfer operation was too slow. I was concerned that it might stress the Synology NAS during compression and that certain file formats may not achieve optimal compression results. I therefore turned it off. Furthermore, I also disabled [backup rotation] because I don’t require a rollback to a specific version of my data. A single version will suffice for me in cloud storage.

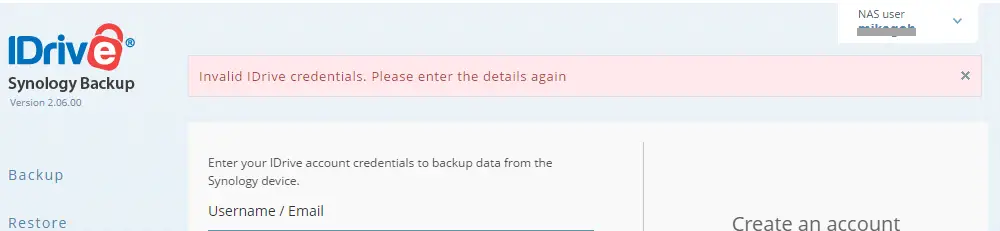
Update (14-Dec-23): The Synology app IDrive is unable to support the e2 product, resulting in browser error indicating Invalid IDrive credentials. Please enter details again
Restore from IDrive e2 with Hyper Backup Explorer
Hyper Backup files and folders are backed up in their proprietary format. Consequently, we are unable to restore data by directly downloading files from IDrive buckets.
“Synology Hyper Backup Explorer is a compact desktop tool that helps you quickly browse and copy different versions of backup data for immediate use.” – Synology Knowledge Center
- Download and install Synology Hyper Backup Explorer from Download Center here
- Unzip and run HyperBackupExplorer.exe
- Log in IDrive e2 bucket to download entire .hbk folder (e.g., syn223j_1.hbk) to desktop
- Select Browse Local Backup and navigate to *.bkpi file (e.g., SynologyHyperBackup.bkpi)
- The backup folder and files should be in their original state when you open them.
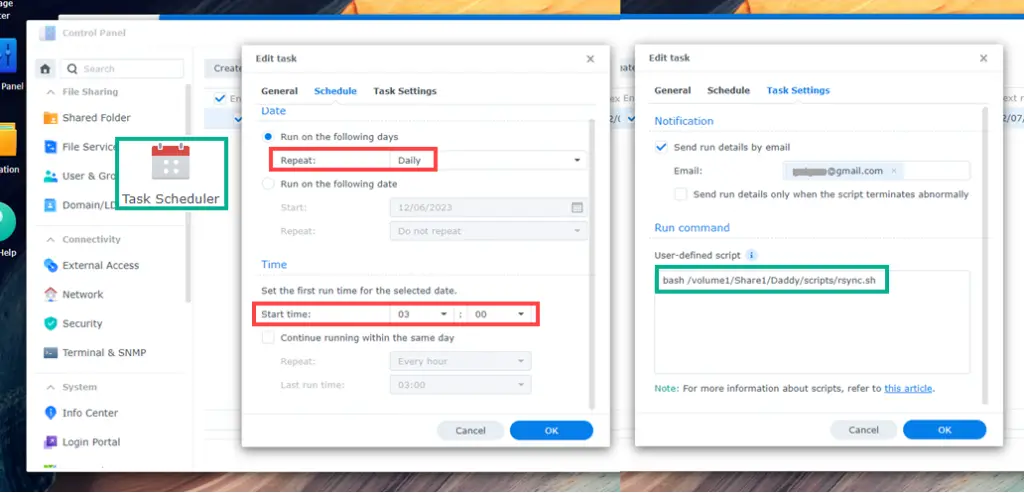
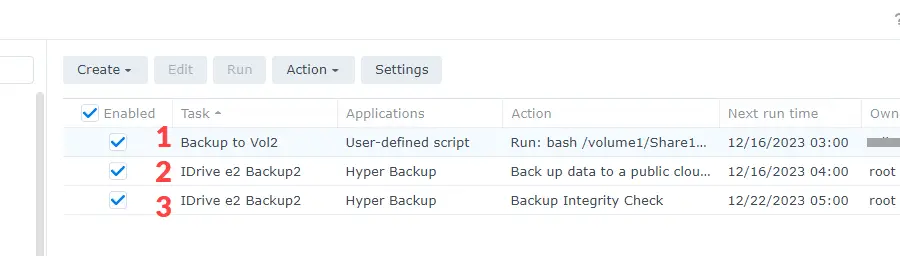
DSM Task Scheduler
- Task 1 entails synchronizing volume1 (HDD1) to volume2 (HDD2) by utilizing a Bash script. 3am daily
- Task 2 involves the backup of data from volume2 to a cloud storage IDrive using Hyper Backup. 4am daily
- Task 3 examines the integrity of the remote hyper backup (Hyper Backup > Backup Integrity Check). 5am once a week.
HDD vs. SSD for Backup
Years ago, I conducted extensive research before deciding to switch from a 3.5″ regular hard disk drive (HDD) to a 2.5″ solid-state drive (SSD) during the rebuilding of my degraded RAID 1. The main reason was that it would last longer without using mechanical parts to read and write data. After both my SSDs (RAID 1) died on me simultaneously, I had to re-evaluate this topic again, since I now have the option of either installing new regular hard disk drives or continuing to use SSDs. I asked questions on Reddit and in the LowEndTalk forum, and here are the insights I gleaned.
- The typical 1 Gbps network bandwidth with a transfer speed of 110-130 MB/s is likely to be the bottleneck, whereas my pair of Crucial MX500 has sequential read 560 MB/s and write 510 MB/s, according to the Crucial specs.
- The SSD is intended for frequently accessed data for multiple users, whereas the hard disk is intended for cold storage archival purposes.
- SSDs are advantageous for caching files in a 4-bay+ NAS by placing frequently accessed files onto it.
- SSDs are pricier than HDDs for the same 2 TB storage size, but they are quieter in some aspects.
- Some folks say that modern SSDs have now got better reliability and are worth the trade for a better user experience over cost.
Points 1 and 2 had a significant impact on my decision to utilize a 3.5″ hard drive instead of an SSD as a component of my 3-2-1 backup strategy. As can be observed from Point 1, the transfer speed of a 5GB MP4 file from my personal computer to the shared folder is 113 MB/s. I’ve stopped streaming movies from the NAS following my subscription to Disney+, and the NAS’s primary function is now primarily dedicated to archiving family photos and personal documents, which aligns with Point 2. Other points include the fact that the Crucial MX500 isn’t listed on the Synology hard drive/SSD compatibility list, and that the pair of MX500 could be inserted into a computer or laptop for improved read/write performance.
Furthermore, I have had a pair of SSDs that failed on me before, and I am a little hesitant to go down this route again. You can put 1 hard drive and 1 solid-state drive in a separate storage pool, but Synology won’t let you put both hard drives and SSDs in the same pool. I learned this when I mixed hard drives and SSDs to make a storage pool for RAID-1.
Conclusion
I spent a lot of money to get my data back because I thought using RAID 1 was enough. The choice of a backup strategy will be contingent on the individual’s requirements, as there is no universal solution. If you are not interested in subscribing to yearly cloud storage, or you prefer not to store data on the cloud, you can connect an external hard disk to your NAS instead. I had trouble deciding between hard drives and SSDs, and I wasn’t sure if I should keep using RAID 1, but thanks to the Internet, I found out all the answers.
Ultimately, I’m looking to preserve all family snapshots as cherished keepsakes by employing a reliable 3-2-1 backup strategy that I’m confident is the best fit for my requirements.