Introduction
Yes, I admit I am cycling frantic now. I invested in a helmet, bag, lubricant, and even a pair of cycling shorts. I ride at least twice a week to and fro to my workplace, and my legs will itch if I don’t cycle at least once a week. I have been through heavy rains drenching dripping from eyebrows and under hot morning rising sun. I am meticulous in taking care of my newly acquired bike that I wash and clean after each ride. Behold, my military green stocked Java Zelo V2, which I bought for SGD$210 off Carousell.
Background
January 2022, the beginning of a new year, and suddenly, I felt like owning a bike! I spent the next two weeks searching various marketplaces (Carousell, Shopee, and Facebook buy/sell groups) for cheap used foldie in the sub $100 – $150 range. I got introduced to brands such as HITO, HACHIKO, and ALEOCA. I set 2 criteria – 7-speed shifter (as long as not single) and 20-inch to fit in public transport. One friend recommended a new Java bike for the relatively low price tag of $300. I grew restless after weeks and weeks of undecided which bicycle to purchase. A Carousell listing listed a used Java Zelo V2 for $240, but what caught my attention was the meet-up place, two blocks away from my estate and the rest is history. This article will show some helpful tips to adjust a foldable bike that I feel will be useful for first-time owners.
Disastrous Unforgettable First Ride Out
The seller told me the head tube needed tightening as the handlebar wobbles, and he installed a Litepro seatpost protect sleeve because the seat tends to sink downwards. My thoughts were like, “Ok, whatever you said. Quick, let’s deal, I want to be the new owner of this Java bike now”. A couple of days later, I took it out for a test spin without checking or tuning anything. I started from the PCN near Great World City, and my destination was Gardens by the Bay but stopped short at the Esplanade (Jubilee) Bridge because I am not very confident of the remaining route.
A series of unfortunate events happened on the return trip.
- The slipping seatpost annoyed me plenty, and it was slipping so often to the extent I had to disembark and pull the seat post up every 5 minutes.
- The saddle tilted due to my weight and riding over humps, and subsequent adjustments only made it worst (became even looser). It was uncomfortable, squeezing my ‘balls’ as my body weight shifted frontal as I cycled.
- I was caught unexpectedly in a downpour, and I had to wipe my face as rainwater dripped from my eyebrows continuously.
Uncomfortable pedaling due to seat height, tilted saddle, and wet thoroughly – indeed unforgettable.
Tips for New Bike Owners
I have learned much in the last month, and I am still discovering my foldie after each trip. I am not a professional cyclist, but I am proud that I did all the tuning independently without paying for service at a bicycle shop. Get ready your hex key, also known as Allen key, for they will be heavily relied upon for tuning a bicycle. Please take my advice with a pinch of salt; I am sharing my experience to have a more easy-going first trip for first-time bike owners.
Tip 1 – Check Tire Pressure and Invest in an Air Pump!
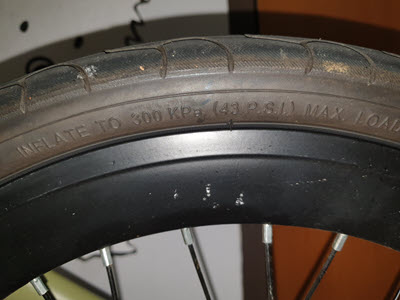
This tip is an important one for sure. The seller told me he pumped the tires before selling to me, and I have been riding the bicycle for the past month, disregarding the tire pressure as it was never on my checklist. “Your rear tire is flat! Your rear tire is flat!” one cyclist shouted to me while I was cycling to work one morning. Back in the office, a colleague assisted me with an electric air pump, and he told me my rear tire pressure was only 10 PSI. The stock tire had a max pressure of 43 PSI (description on tire), and he pumped ‘hard’ for both tires. You may want to pump a few PSI more for the rear tire due to your body weight.
The ride home was stunning!! Why so? I reached new top speed (yeah, even after riding more than ten trips), and my ears could now hear the wind howling as I sped through a straight road. I even used Gear 5 to peddle uphill (usually with Gear 2 ) because my speed is faster due to less rolling resistance. The time it took for the entire journey from office back to home was at least reduced by 20%, and I find myself less exhausted than usual.
Tip 2 – Tilted Bike Seat
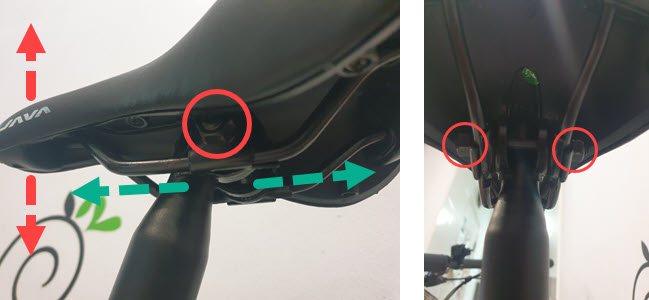
The other day, I came across a blog where the owner complained that the seat tilted (like mine did) when he cycled home after purchasing a brand new Java bike from a physical bicycle shop. One will need the help of a wrench to tighten both Hex Nut (red circle) to prevent the saddle from being tilted (red arrows) or loosen it to shift the seat forward or backward (green arrows).
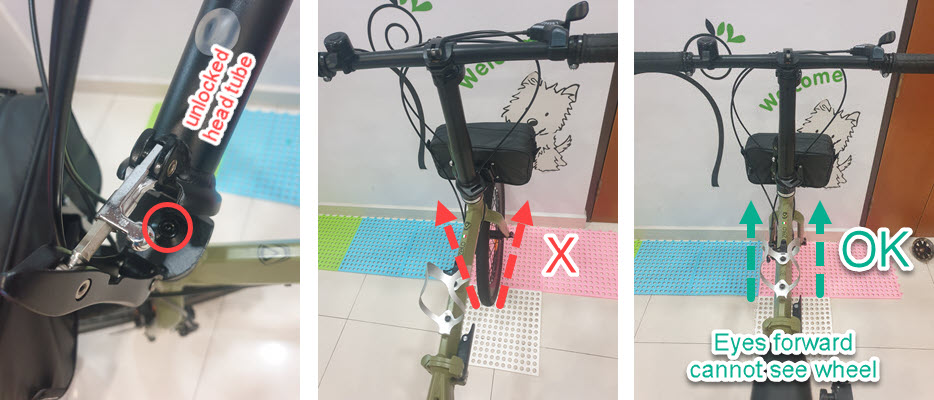
Tip 3 – Head Tube vs. Seatpost Height
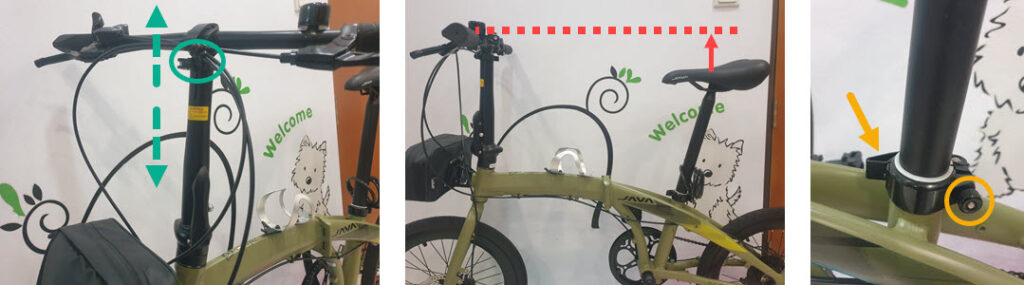
I cycled the first few trips with the head tube extended by 20cm (green arrows) because the seller sold the bike to me like this. He told me my height is similar to his, so no adjustment is required. While I’m not going into the details of the bicycle riding position, your body will tend to be more upright with a ‘taller’ head tube height and lower seatpost. In my online research, I found out that the seatpost is usually shorter by an inch or two (red arrow) versus the tube height. Hence, I adjusted (green oval) mine down; while I don’t feel much difference before and after, the bike just looked more like a ‘standard’ setup.
If you find the seat post slipping down over humps or journey, you need to tighten the circular bolt by hand (yellow circle) clockwise direction when in the unlocked position. Beware, the C-clamp will gain a lot of resistance to the extent it is impossible to lock it into place if you over tighten. And you do not need any tool to do it. Had I known this beforehand, I would not have encountered an awful first trip experience whereby I had to readjust my seatpost every 5 minutes. So, how easy is that? (don’t laugh at me)
Tip 4 – Front Wheel Axle Adjustment
I don’t understand the seller’s explanation when he said something about wobble when handling the bike. Then, he tried to use his multi-tool Allen key to turn this bolt (red circle) on the head tube, but his tool could not tighten it due to the height of the extended Allen key. It was only until my 3rd or 4th ride then I realized my bicycle kept drifting to the left even when I held my handlebar straight. I would think a bicycle shop would have an apparatus to align the front wheel to the body frame, but I had to use my eyes to align and tighten the bolt (red circle) at home.
Tip 5 – Push and Insert Handlebar Grip
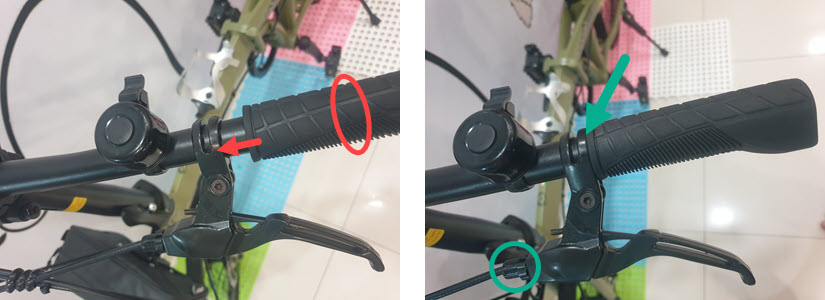
Again, it was only after the 5th ride that I noticed that the left handlebar grip was 1/3 out (red arrow). While this had not affected my riding experience all this while, I did imagine my left arm would have opened at a wider angle when traveling straight. Twist the grip (red oval) to insert the handlebar grip fully (green arrow). You may also want to turn the brake levers slightly downwards to the front at an angle that you feel is right. There are also barrel adjusters (green circle) to tighten the brake cable (for the brake), but you may want to read and watch the video tutorials online by others.
Tip 6 – Fix a Slipped Bicycle Chain
No, it will never happen because my bicycle is relatively new and I take good care of it. It is a misconception because I dismounted to cross the barrier gate to my office one fine day, but when I mounted back onto my bike and started to pedal, the bicycle chain slipped off. I went into panic mode because I was embarrassed in front of the guard post, and colleagues were driving into the office.
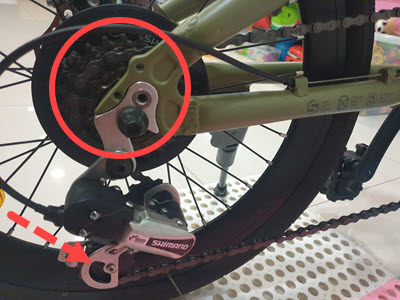
The proper method is to set the gear to the smallest disc (for Java Zelo, it is the highest gear 7). Then, push the rear derailleur arm (red arrow) to get some slack on the chain. Finally, use your hand to slide the chain back on the smallest disc (red circle). But that day, I unwittingly resolved it by lifting my bike with one hand and the other to backpedal to get some slack on the chain. Back in the office, I told one of my colleagues what happened, and he joked with me, “Everything (IT projects) also outsource, then encounter a problem don’t know what to do…” =)
Bike Accessories
These are the bike accessories or gears I bought and why I felt I needed them. My next to-buy item will be an electric or foot air pump for the tire.
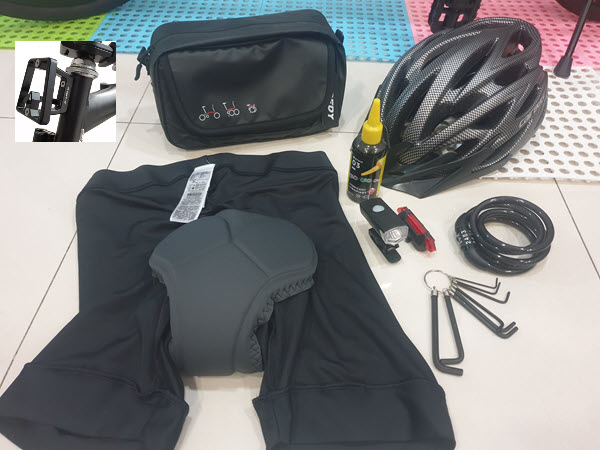
| Accessories | Reasons I bought it | Cost (SGD$) |
|---|---|---|
| Bicycle Lubricant | All-weather from Decathlon. "Take care of your equipment, and the equipment will take care of you". | $6 |
| Water Bottle Cage | Although some sellers may include it as freebies, the stock Java did not come with it. | $7 |
| LED front/ back Light | I purchased because I went night cycling with my Uni classmates. Not necessary because Park Connector Network (PCN) is brightly lit but for safety reasons if you ever need to go on roads in between. | $7 |
| Cycling Shorts | Mainly for long-distance cycling. It was unpleasant to wear at first, but the unpleasantness went away, and no butt pain during cycling and after. I did consider padded bike saddle vs. cycling shorts but opted for the latter. | $15 |
| Bike Helmet | I am good on a bicycle, and I rarely fall, but I have a family to take care of now, so this is the first item that I purchased. | $21 |
| Aluminum Front Block | Java Zelo allows this installation for mounting front block bag. | $22 |
| Small Waterproof Bag | To store my house keys, mobile, and wallet when I cycle to work without a backpack. | $28 |
| (Electric or Foot) Air Pump | If not for a flat tire, your bicycle will fly, and your riding comfort will increase to another level. Trust me on this! | (yet to purchase) |
Conclusion
I can still remember my parents bringing me to East Coast Park to cycle pay-by-hour rented bicycles when I was a kid. I had always enjoyed cycling, and I never regretted purchasing a bike of my own. It is truly a meaningful experience learning the mechanics of a bicycle, from riding postures to fine-tuning every nut and bolt to make future rides comfier. There was a satisfaction to be able to sway my bicycle past people, navigate bends and obstacles. Maybe my wife had some reservations when I told her I wanted to purchase a bicycle given our small house but seeing how I enjoyed the healthy bicycle rides; she had no whine about it as she even tucked in a raincoat for me in the front block bag in case it rains… how sweet. Lastly, cycling to work on top of my weekly jogs made me less guilty of munching on potato chips!